
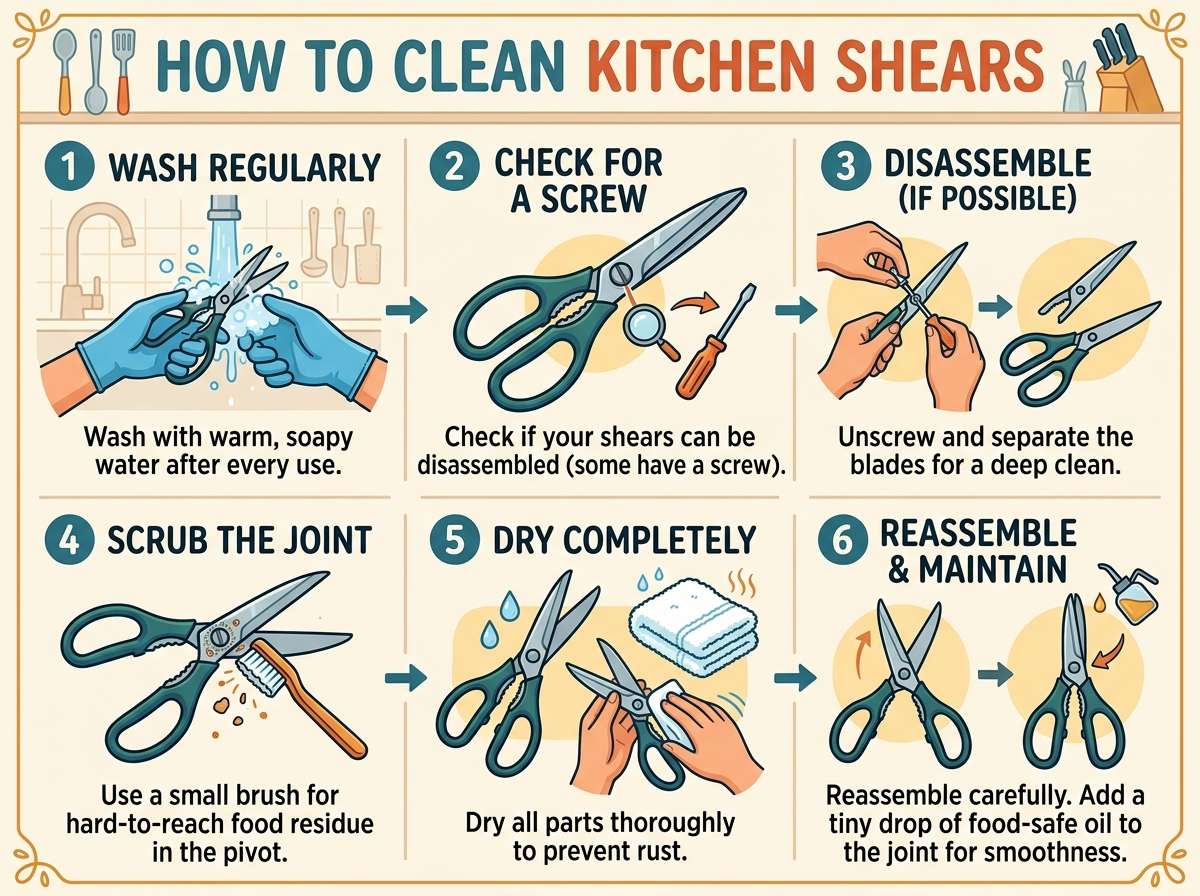
How to Clean Kitchen Shears?
Kitchen shears sit in almost every drawer, yet most people forget they need real care. You grab them to snip herbs, cut through chicken bones, open packages, or trim the fat off a steak, and then you toss them back in the drawer without a second thought. Over time, that habit builds up grease, food bits, and bacteria right where your food touches next. If you want your shears to work well and stay safe to use, you need a cleaning routine that actually works.
In this article
This guide walks you through everything, step by step, in plain language. No fancy tools, no confusing terms. Just clear, easy steps anyone can follow, even if you have never given your shears a proper scrub before.
Why Cleaning Kitchen Shears Matters So Much
Kitchen shears do a lot of dirty work. They cut raw meat, herbs, plastic packaging, and sometimes even flowers or twine. Each of these tasks leaves behind residue, and that residue builds up fast in the tight spots near the pivot screw and the blade edges.
Here’s the real problem: raw meat and poultry carry bacteria like salmonella and E. coli. If you don’t clean your shears right after cutting chicken, those germs can spread to the next thing you cut, even if it’s just a lemon or a loaf of bread. This is called cross-contamination, and it’s one of the most common causes of foodborne illness at home.
On top of the health risk, dirty shears just don’t cut as well. Grime and rust make the blades dull and sticky, so you end up fighting with your food instead of slicing through it cleanly. A well-kept pair of shears should glide through skin, bone, and stems without any resistance.
Clean shears also last longer. Rust and buildup wear down the metal over the years, and a good pair of kitchen shears can cost quite a bit. Taking five minutes to clean them after each use protects that investment and keeps your kitchen safer for everyone who eats there.
What You’ll Need Before You Start
Gathering your supplies first makes the whole process faster. Here’s a simple list of things that work well:
- Warm water
- Dish soap
- A soft scrub brush or an old toothbrush
- A microfiber cloth or clean kitchen towel
- White vinegar (for tougher grime or rust spots)
- Baking soda (optional, for stubborn stains)
- A cotton swab (great for tight corners)
- Food-safe mineral oil (for the final polish and pivot lubrication)
You likely already have most of these items sitting in your kitchen right now. Nothing here is expensive or hard to find.
Step 1: Take the Shears Apart, If They Come Apart
Many kitchen shears have a pull-apart design. Look for a small notch or lever near the pivot screw. If your pair separates into two blades, take them apart before you clean. This lets you reach every corner, especially the parts near the hinge where grime loves to hide.
If your shears don’t separate, don’t worry. You can still clean them thoroughly with the steps below; it just takes a little extra attention around the joint.
Step 2: Rinse Off the Big Chunks First
Before you scrub anything, run the shears under warm water to knock off any loose food bits, fat, or residue. This first rinse saves your sponge from picking up chunks of old food and spreading them around later. Hold the blades under the tap and let the water push away anything sitting on the surface.
Avoid soaking wooden-handled shears in water for a long time, since wood can warp or crack if it stays wet too long. A quick rinse is enough at this stage.
Step 3: Wash With Warm, Soapy Water
Fill your sink or a bowl with warm water and add a squirt of dish soap. Swish it around until it turns slightly foamy. Dip your shears in and let them sit for a minute or two, especially if there’s dried grease or sticky residue.
Grab your soft brush or toothbrush and scrub the blades on both sides. Pay close attention to the edges, since that’s where most bacteria and buildup collect. Work the brush into the pivot area too, since food and oil often get trapped right where the two blades meet.
If your shears have a bottle opener, nutcracker, or any other built-in tool near the handle, scrub those spots as well. People often skip these little extras, but they collect just as much grime as the blades.
Step 4: Rinse Thoroughly
Once you’ve scrubbed every part, rinse the shears under warm running water again. Make sure no soap residue remains, since leftover soap can leave a bitter taste on food later. Turn the shears over a few times under the stream to catch every angle, including the underside of the blades and the screw area.
Step 5: Dry Them Right Away
This step matters more than most people realize. Metal left wet for even a short time can start to rust, especially around the pivot screw where moisture sits and doesn’t evaporate quickly. Grab a clean towel or microfiber cloth and dry every surface, including the handles and any crevices near the joint.
For extra peace of mind, you can leave the shears open on a dish rack for ten to fifteen minutes to air dry fully before you put them away. This little extra step helps prevent hidden moisture from turning into rust down the road.
Step 6: Tackle Tough Stains or Sticky Residue
Sometimes soap and water alone don’t cut it, especially if the shears have gone a while without a proper clean. Here are a few tricks that work really well for stubborn spots:
Vinegar soak: Mix equal parts white vinegar and water in a bowl. Soak the blades for about ten minutes, then scrub with your brush. Vinegar breaks down grease and mineral deposits, and it also helps lift light rust spots.
Baking soda paste: Mix baking soda with a small splash of water until it forms a thick paste. Rub it onto stained or discolored spots with your brush, let it sit for a few minutes, then rinse clean. This works great on sticky residue from fruit, herbs, or sap.
Lemon and salt: Cut a lemon in half and dip it in coarse salt. Rub it over the blades in a circular motion. The acid in the lemon combined with the gritty salt lifts stains and leaves a fresh smell behind.
Always rinse and dry the shears fully after using any of these methods, since acidic ingredients like vinegar and lemon shouldn’t sit on metal too long.
Step 7: Disinfect After Cutting Raw Meat or Poultry
Regular washing with soap and water removes visible grime, but it doesn’t always kill every germ. After cutting raw chicken, fish, or meat, it’s smart to disinfect your shears fully.
You have two easy options:
Bleach solution: Mix one tablespoon of unscented bleach with one gallon of water. Dip the shears in this solution for about a minute, then rinse thoroughly under clean water and dry right away.
Vinegar and hydrogen peroxide: Spray the blades with white vinegar, then follow with a spray of hydrogen peroxide (don’t mix them together in one bottle; use them one after the other). Let the shears sit for a minute, then rinse and dry.
Either method knocks out bacteria that plain soap might miss, giving you extra confidence that your next ingredient stays safe.
Step 8: Handle the Pivot Screw With Care
The pivot screw is the small bolt that holds the two blades together, and it’s often the messiest part of the whole tool. Grease, food particles, and rust love to build up right in this tight spot.
Use a cotton swab dipped in soapy water to clean around the screw carefully. If the screw looks loose or squeaky after cleaning, add one tiny drop of food-safe mineral oil to keep it moving smoothly. Wipe away any extra oil so it doesn’t drip onto your food later.
If your shears are the pull-apart type, this is also a good moment to check the little hook or notch that holds the blades together. A quick wipe here keeps the mechanism working the way it should for years.
Step 9: Polish and Oil for Long-Term Care
Once everything is clean and dry, a light coat of food-safe mineral oil helps protect the metal from rust and keeps the blades moving without sticking. Apply a few drops to a soft cloth and wipe it along both blades and the pivot point.
This step isn’t required every single time you wash your shears, but doing it once every couple of weeks (or after a deep clean) adds a nice protective layer, especially if you live somewhere humid.
How Often Should You Clean Your Kitchen Shears?
The honest answer is: after every single use. It sounds like a lot, but it really only takes a couple of minutes once it becomes a habit. Here’s a simple breakdown:
- After cutting raw meat or poultry: Wash and disinfect right away, every time, without exception.
- After cutting herbs, fruit, or vegetables: A quick wash with soap and water is enough.
- After opening packages or plastic: Wipe down with a damp cloth, then dry.
- Deep clean: Once a week or two, give your shears the full treatment with vinegar or baking soda to keep them in top shape.
Building this into your regular kitchen cleanup routine keeps your shears sharp, safe, and ready whenever you need them.
Common Mistakes to Avoid
A lot of people damage their kitchen shears without even realizing it. Here are a few habits worth breaking:
Tossing them in the dishwasher. Even if the label says dishwasher safe, the heat and harsh detergent can dull the blades and loosen the pivot screw over the years. Hand washing is gentler and keeps your shears sharp much longer.
Leaving them wet in the sink. Sitting in a puddle of dirty dishwater is one of the fastest ways to invite rust, especially around the joint and screw.
Skipping the disinfecting step after raw meat. This one is a food safety risk, not just a maintenance issue. Always go the extra mile after cutting anything raw.
Using abrasive scrubbers. Steel wool or rough scouring pads can scratch the blade surface, creating tiny grooves where bacteria and grime can hide even after washing.
Storing them wet in a drawer. Closed, damp drawers trap moisture, which speeds up rust formation. Always dry your shears fully before putting them away.
How to Store Kitchen Shears the Right Way
Storage plays a bigger role in shear care than most people think. Here are a few simple tips:
- Store shears in a knife block or a dedicated drawer organizer so the blades don’t rattle around and bump into other utensils.
- Keep them closed when not in use to protect the edges and prevent accidental cuts.
- Avoid tossing them loosely in a drawer with other metal tools, since this causes nicks and dulls the blades over time.
- If you live in a humid climate, consider a small silica packet in the drawer to absorb extra moisture.
Signs It’s Time to Replace Your Kitchen Shears
Even with great care, shears don’t last forever. Watch for these signs that it might be time for a new pair:
- The blades feel dull no matter how much you sharpen them
- Rust keeps coming back even after a thorough clean
- The pivot screw feels loose and wobbly, even after tightening
- The handles crack or feel uncomfortable to grip
- The blades no longer line up evenly when closed
If you notice a few of these signs together, it’s probably time to treat yourself to a fresh pair.
Final Thoughts
Cleaning kitchen shears really doesn’t take much time once you build the habit. A quick rinse, a soapy scrub, a full dry, and the occasional deep clean with vinegar or baking soda keeps them sharp, safe, and ready for anything your kitchen throws at them. Add in a light coat of mineral oil now and then, store them properly, and you’ll get years of smooth, reliable use out of a tool you probably reach for every single day.
Take care of your shears, and they’ll take care of your meals, one clean cut at a time.

Mary is a home cooking enthusiast and kitchen gear reviewer with a passion for practical cookware and food preparation tools. She enjoys testing cutting boards, knives, kitchen gadgets, and other cooking essentials to help home chefs make smarter buying decisions. Through KitchenCutting.com, Mary shares honest product reviews, buying guides, and helpful kitchen tips to make cooking easier, safer, and more enjoyable.


