How to Remove Mold From Wood Cutting Board?
Wooden cutting boards are a staple in most kitchens. They look great. They feel nice to hold. They don’t damage your knives like plastic or glass does. But here’s the problem—wood is porous. That means it soaks up water, food particles, and all kinds of moisture. When moisture sits in wood for too long, mold grows. If you’ve spotted dark spots or fuzzy patches on your cutting board, don’t panic. This guide will walk you through everything you need to know about cleaning mold off wood and preventing it from coming back.
In this article
Why Mold Loves Your Wooden Cutting Board
Mold doesn’t just show up for no reason. It needs three things to grow: moisture, warmth, and something to feed on. Your wood cutting board provides all three.
Wood is made up of tiny pores and grain structures. When you use your board, water gets into these spaces. Food bits stick around too. If you don’t dry your board completely after washing, that moisture stays trapped inside. Warmth from your kitchen helps mold spores grow faster. Mold feeds on the organic material in the wood. That’s basically everything in a wooden cutting board.
The good news? You can stop mold before it takes over. The better news? You can clean your board and keep it safe to use again.
Spotting Mold on Your Cutting Board
Before you start cleaning, you need to know what you’re dealing with. Not all dark spots are mold. Sometimes your board just has stains.
Mold looks like fuzzy patches or spots. The color can be black, green, blue, or even white. It might feel slimy or powdery to the touch. The smell is a big clue too. Mold smells musty and off. If your board has that gross, earthy smell, mold is probably the culprit.
Stains look different. They’re flat. They sit on top of the wood or just below the surface. Stains don’t smell bad. They don’t feel fuzzy. If you’re not sure, assume it’s mold. Better safe than sorry when it comes to your health.
The amount of mold matters. A little surface mold is easy to fix. Deep mold that goes into the wood grain is trickier. If your board is covered in mold or you can see it growing deep into the wood, you might need to replace your board instead of saving it.
What You’ll Need to Clean Your Board
Cleaning mold is simple. You probably have most of what you need already.
Vinegar – White vinegar is your best friend here. It kills mold without toxic chemicals. Buy the regular kind from any grocery store.
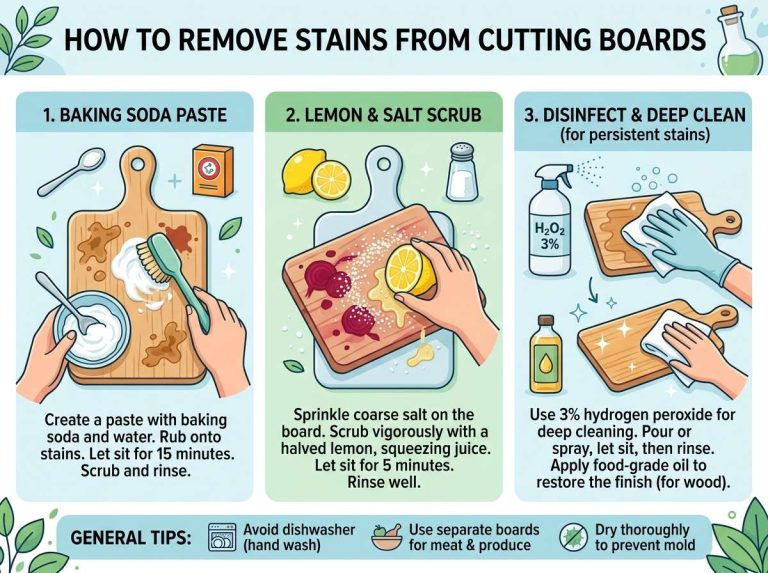
Baking soda – This stuff works wonders. It scrubs away mold and kills spores deep in the wood. Keep a box in your kitchen.
Lemon juice – Fresh lemon juice has natural acids that kill mold. You can squeeze fresh lemons or buy bottled juice.
Salt – This acts as a scrub. It also helps pull moisture from the wood.
Water – You need clean water for rinsing.
Cloth or soft brush – Use something that won’t scratch your board. An old kitchen cloth works great. A soft-bristled brush is also fine.
Spray bottle – A basic spray bottle lets you apply vinegar evenly.
Paper towels – You’ll use these for drying.
Gloves – Wear gloves to protect your hands. You don’t need fancy ones. Regular rubber kitchen gloves work fine.
You don’t need bleach. You don’t need harsh commercial cleaners. The simple ingredients above are all you need for safe and effective mold removal.
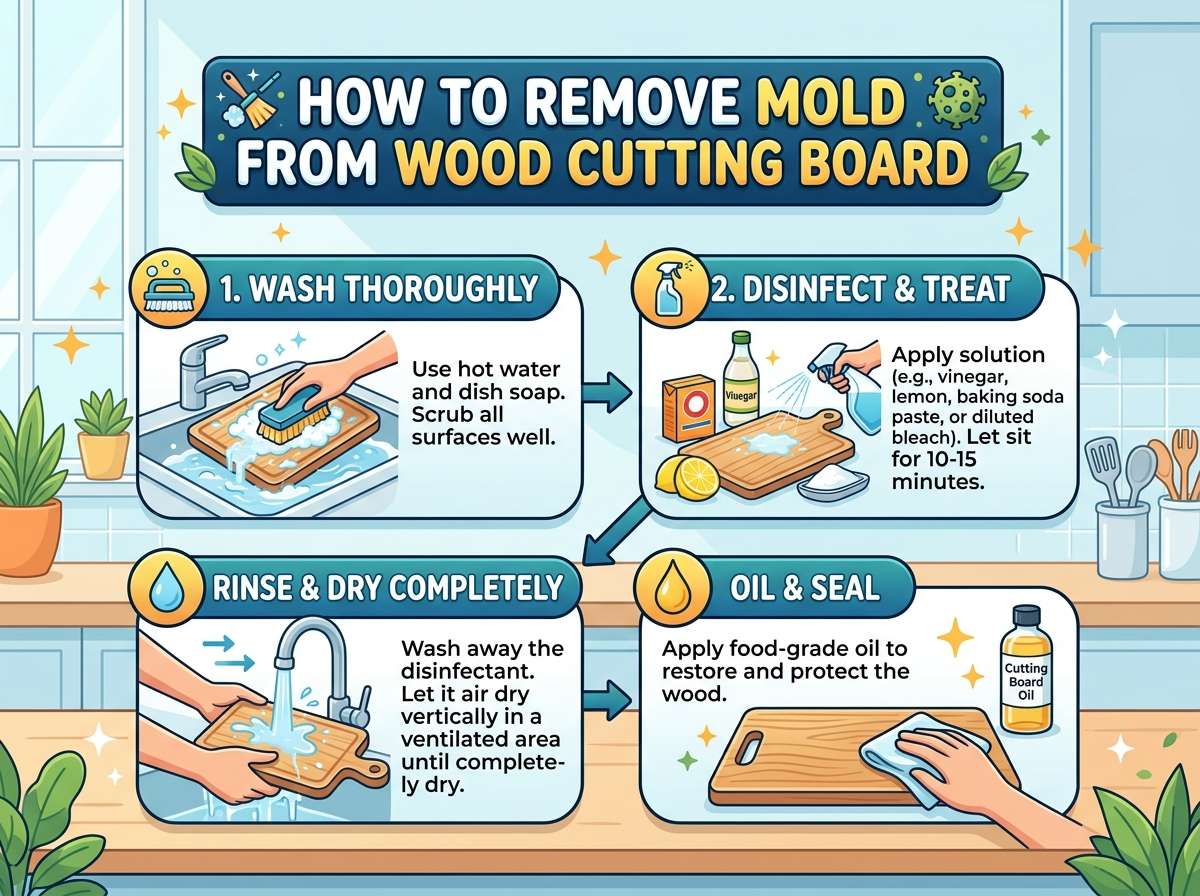
Method One: The Vinegar and Baking Soda Combo
This is the most popular method, and for good reason. It works well and uses safe ingredients.
Step 1: Safety first
Put on your gloves. Open a window to get fresh air flowing. You want to make sure your kitchen stays well ventilated while you work.
Step 2: Spray the board
Pour white vinegar into your spray bottle. Spray the entire affected area. Don’t spray so much that your board is dripping wet. A light coating is enough. Let it sit for a few minutes. The vinegar starts killing mold spores right away.
Step 3: Make a paste
In a small bowl, mix baking soda with a little water. You want a thick paste. It should be thick enough to stay on your board without running off.
Step 4: Scrub the mold away
Take your soft cloth or brush and apply the paste to the moldy spots. Scrub in circular motions. Don’t scratch the wood too hard, but do apply firm pressure. You’re trying to get into the grain where mold hides. Keep scrubbing for a few minutes. You should see the dark spots getting lighter.
Step 5: Let it sit
After you scrub, leave the paste on for about 10 to 15 minutes. This gives the baking soda time to kill deep mold spores. You can use this time to relax or do other kitchen tasks.
Step 6: Rinse thoroughly
Use clean water and a damp cloth to rinse away all the baking soda paste. Make sure you get into all the cracks and grain lines. Any leftover baking soda will feel gritty later, so take your time here.
Step 7: Dry completely
This step is super important. Use paper towels or a clean cloth to dry your board. Get it as dry as possible. Then stand it upright or lean it against something so air can flow around it. Let it air dry for at least 24 hours before you use it again.
Method Two: The Lemon and Salt Scrub
If you like natural solutions, this method is for you. Lemons and salt work together to fight mold.
Step 1: Prepare your supplies
Grab a fresh lemon and cut it in half. You’ll use the lemon itself as your scrubbing tool. Pour salt onto a small plate. Have your gloves and paper towels ready.
Step 2: Salt the board
Sprinkle salt all over the moldy areas. Don’t go crazy with the salt. A generous coating is enough. Salt pulls moisture from the wood and helps scrub away mold at the same time.
Step 3: Scrub with lemon
Take your lemon half and rub it over the salt. Press down as you rub. The lemon juice mixes with the salt to create a cleaning paste. The acidic lemon juice kills mold. The salt scrubs it away. Work the mixture into the wood grain by rubbing in circular motions. Keep going for a few minutes until the spots start fading.
Step 4: Let the juice work
Leave the lemon juice and salt mixture on your board for about 10 minutes. This gives the natural acids time to kill mold deep in the wood.
Step 5: Rinse with clean water
Rinse your board under clean running water. Make sure you wash away all the salt and lemon juice. Use your cloth to help remove any stubborn salt crystals.
Step 6: Dry thoroughly
Dry your board completely with paper towels. Stand it upright to air dry for 24 hours before using it again.
Method Three: The Vinegar and Salt Direct Attack
This method combines two powerful cleaning agents. It’s quick and effective.
Step 1: Cover the board with salt
Sprinkle salt over all the moldy spots on your cutting board. Cover the affected areas well.
Step 2: Spray with vinegar
Pour vinegar into your spray bottle. Spray the salt-covered areas until the salt is wet but not dripping. The vinegar reacts with the salt to create a powerful cleaning mixture.
Step 3: Scrub aggressively
Use your brush or cloth to scrub the mixture into the wood. Don’t hold back here. You want to get the salt and vinegar deep into the grain. Scrub for 2 to 3 minutes.
Step 4: Wait for the magic
Let the mixture sit on your board for about 15 minutes. The combination of vinegar and salt is tough on mold spores.
Step 5: Rinse and dry
Rinse the board completely under clean water. Use a cloth to help remove salt crystals. Dry with paper towels and then air dry upright for 24 hours.
Why Prevention Is Your Best Tool
Cleaning mold is easy. Preventing mold is easier. If you stop mold before it starts, you’ll never have to clean your board again.
Keep your board dry
This is the number one rule. Mold can’t grow without moisture. Wash your board after every use. Then dry it right away with a cloth. Don’t leave it dripping wet in the sink.
Store it upright
Stand your cutting board up against a wall or in a rack. This lets air flow around it. Never stack wet boards on top of each other. Never store a damp board flat in a drawer. Moisture gets trapped, and mold loves that.
Use it regularly
A cutting board that sits in a cabinet for months might develop mold. If you use your board often, it dries out between uses. Active use keeps mold away.
Oil your board
Mineral oil protects wood. Once a month, rub mineral oil into your board. Let it soak in. This seals the wood slightly and makes it less attractive to mold. Food-grade mineral oil is safe and easy to find.
Sand it occasionally
Over time, your board’s surface gets worn. Micro-scratches and grooves trap moisture and food particles. Every couple of times a year, lightly sand your board with fine-grit sandpaper. This smooths the surface and removes old stains. After sanding, oil your board.
Store in a dry place
Keep your cutting board in a dry part of your kitchen. Avoid areas near the sink, dishwasher, or stove where steam builds up. These spots are mold heaven.
When Should You Replace Your Board Instead of Cleaning It?
Sometimes your board is too far gone. Cleaning won’t save it, and using it isn’t safe.
Replace your board if mold has grown deep into the wood. If the mold goes more than a quarter inch into the wood, it’s too deep to clean completely. Spores hide where you can’t reach them.
Replace your board if it smells like mold even after cleaning. That smell means mold is living deep inside. You can’t fully remove it.
Replace your board if it has deep cracks or splits. Mold hides in these places. You can’t clean every spot. It will come back.
Replace your board if you’ve had mold on it more than once. Repeated mold means the wood is compromised. It’s not worth the risk.
Replace your board if it’s very old or damaged. A new board is cheap compared to the hassle of dealing with mold forever.
Safe Cutting Board Materials
If you decide to replace your board, you have options.
Hardwood boards are traditional and beautiful. They last a long time if you care for them properly. Oak, maple, and teak are popular choices. They’re more expensive than other options.
Bamboo boards are eco-friendly and naturally resistant to mold. Bamboo is harder than most wood, so it doesn’t show knife marks as much. They’re a good middle-ground price.
Composite boards mix wood with other materials. They resist mold better than solid wood but don’t feel as nice.
Plastic boards are cheap and easy to clean. They don’t absorb water like wood does. The downside? They dull your knives faster, and they’re not as nice to use.
Many people keep several boards. Use wood boards for vegetables and bread. Use plastic boards for meat and fish. This prevents cross-contamination and means your wood boards stay cleaner and drier since they get less water washing.
The Truth About Mold and Your Health
You might wonder if mold on a cutting board is dangerous. The answer depends on the mold type and how much mold you’re dealing with.
Some molds are harmless. Others can cause allergic reactions. A few rare molds produce toxins that can make you seriously sick. You can’t tell which type of mold you have just by looking at it.
The safe approach is simple: if you see mold, clean it. If your board has had mold more than once or mold keeps coming back, replace it. Your health is worth it.
Pregnant women, babies, elderly people, and people with weak immune systems should be extra careful. If they might be affected, don’t risk using a moldy cutting board at all. Get a new one.
Quick Tips for Mold-Free Boards
Here are some easy habits that keep your cutting board mold-free:
Wash your board right after you use it. Don’t leave it sitting with food scraps on it.
Dry your board with a cloth immediately after washing. Don’t let it air dry in the sink.
Stand it upright to dry. Never lay it flat.
Clean your sink drain regularly. Mold in your sink can spread to your board.
Don’t soak your wooden board in water. A quick wash is fine. Soaking makes it absorb too much water.
If you notice the start of mold, clean it right away. Small spots are easy. Big infestations are harder.
Use hot water when you wash. Hot water kills mold better than cold.
Spray a little vinegar on your board once a week. This keeps mold from starting.
Keep your kitchen dry. Fix any leaks quickly. Dry spills fast.
Don’t store your board in damp cabinets or near humid areas.
Common Mistakes People Make
Learning what NOT to do helps you avoid problems.
Bleach is not your friend. Many people think bleach kills mold. It does. But bleach can damage wood. It can also leave toxic residue on your food preparation surface. Stick with vinegar and baking soda instead.
Don’t soak your board. Submerging wood in water for long periods makes it absorb too much liquid. This actually invites mold to grow. A quick rinse is all you need.
Don’t use the board while it’s wet. Wet boards are asking for mold. Dry it first.
Don’t skip the drying step. This is where people mess up. They clean the mold but don’t dry the board thoroughly. Mold comes back because the wood is still damp.
Don’t store your board in a damp place. Your under-sink cabinet might be convenient, but humidity loves that spot. Find a drier home for your board.
Don’t ignore small spots. Mold spreads. A tiny spot today becomes a big problem next week. Clean it immediately.
Don’t use harsh scrubbing tools. Steel wool and rough brushes damage the wood. Use soft cloths and soft brushes.
How to Clean Other Kitchen Items to Prevent Mold
Keeping mold away from your cutting board is easier if you keep mold out of your whole kitchen.
Clean your sink drain with baking soda and vinegar weekly. Mold loves drains.
Wash kitchen sponges in hot water after each use. Better yet, replace them weekly.
Dry your sink after use. Don’t leave standing water.
Clean under your sink regularly. Pipe leaks create perfect mold homes.
Check your refrigerator seals. Moisture buildup in the fridge invites mold.
Wipe down damp areas in your kitchen daily.
Keep your kitchen well ventilated. Run your exhaust fan while cooking.
Fix any leaks immediately.
These habits keep your whole kitchen mold-free, not just your cutting board.
Final Thoughts on Protecting Your Cutting Board
Your wooden cutting board is an investment in your kitchen. Good boards last years if you treat them right. Keeping them mold-free is the key to that long life.
The cleaning methods in this guide work. The prevention tips work. Start using them today. If you spot mold, clean it right away with the method you like best. Then focus on prevention so you never deal with mold again.
Wooden cutting boards are worth the extra care. They improve your cooking experience. They’re gentler on your knives. They look beautiful on your counter. Protect them from mold, and they’ll serve you well for years to come.
Remember: moisture is mold’s best friend. Keep your board dry, and mold can’t survive. It’s that simple.
Your Mold-Free Cutting Board Journey Starts Now
You’ve learned why mold grows on cutting boards. You know how to spot it. You have three proven methods to clean it. You understand how to prevent it. Now put this knowledge to work.
Start with prevention today. If you already have mold, pick one cleaning method and tackle it this weekend. Your cutting board will thank you, and your health will be safer for it.
A clean, dry cutting board is a happy cutting board. Make it part of your kitchen routine to keep your board that way. Your future self will be glad you did.

Mary is a home cooking enthusiast and kitchen gear reviewer with a passion for practical cookware and food preparation tools. She enjoys testing cutting boards, knives, kitchen gadgets, and other cooking essentials to help home chefs make smarter buying decisions. Through KitchenCutting.com, Mary shares honest product reviews, buying guides, and helpful kitchen tips to make cooking easier, safer, and more enjoyable.