
How Do Chefs Sharpen Their Knives?
A dull knife is a chef’s worst nightmare. It turns what should be a quick, clean slice into a frustrating battle. Your fingers slip. Your food tears instead of cuts cleanly. Your kitchen prep takes twice as long. But here’s the secret: professional chefs know exactly how to keep their blades sharp, and you can learn to do it too.
In this article
Let’s dive into the world of knife sharpening. You’ll discover why it matters so much, what tools you need, and how to actually do it yourself at home.
Why Sharp Knives Are So Important
Think about the last time you cut a tomato with a dull knife. It squished, right? The blade pressed down on the tomato instead of slicing through it. A sharp knife is completely different.
When a knife is truly sharp, it glides through food. The blade is thin and fine at the edge. This means it cuts with minimal pressure. You don’t need to force it or saw back and forth. You just let the knife do its job.
Sharp knives also keep you safer. This sounds backwards, but it’s true. A dull knife slips and bounces off what you’re cutting. Your hands need to grip tighter. You press harder. The blade can slip and cut your hand. A sharp knife bites into the food and stays there. Your hand stays in control.
Professional chefs understand this from day one of training. Every restaurant kitchen has a sharpening routine. Cooks sharpen their knives before service. They sharpen during prep. Some chefs sharpen multiple times per shift. It’s not optional. It’s part of the job.
What Makes a Blade Dull?
Before you learn to sharpen, it helps to know why knives get dull in the first place.
Every time you cut something, the edge of your knife takes a tiny hit. The blade is magnified metal at the edge. It’s incredibly thin. When it hits a cutting board, the metal flexes. When it hits bone or a hard surface, it bends. Tiny bits of the edge bend to the side or break off.
This happens with every single cut. It happens whether you use a wood board or a plastic board. It happens when you cut soft vegetables or hard squash. The edge just gets a little bit duller each time.
The material matters too. Softer metals dull faster than hard metals. Stainless steel stays sharp longer than carbon steel. But even the best steel will get dull eventually. That’s just how physics works.
The Difference Between Honing and Sharpening
Most home cooks confuse these two things. Chefs don’t. They’re actually very different.
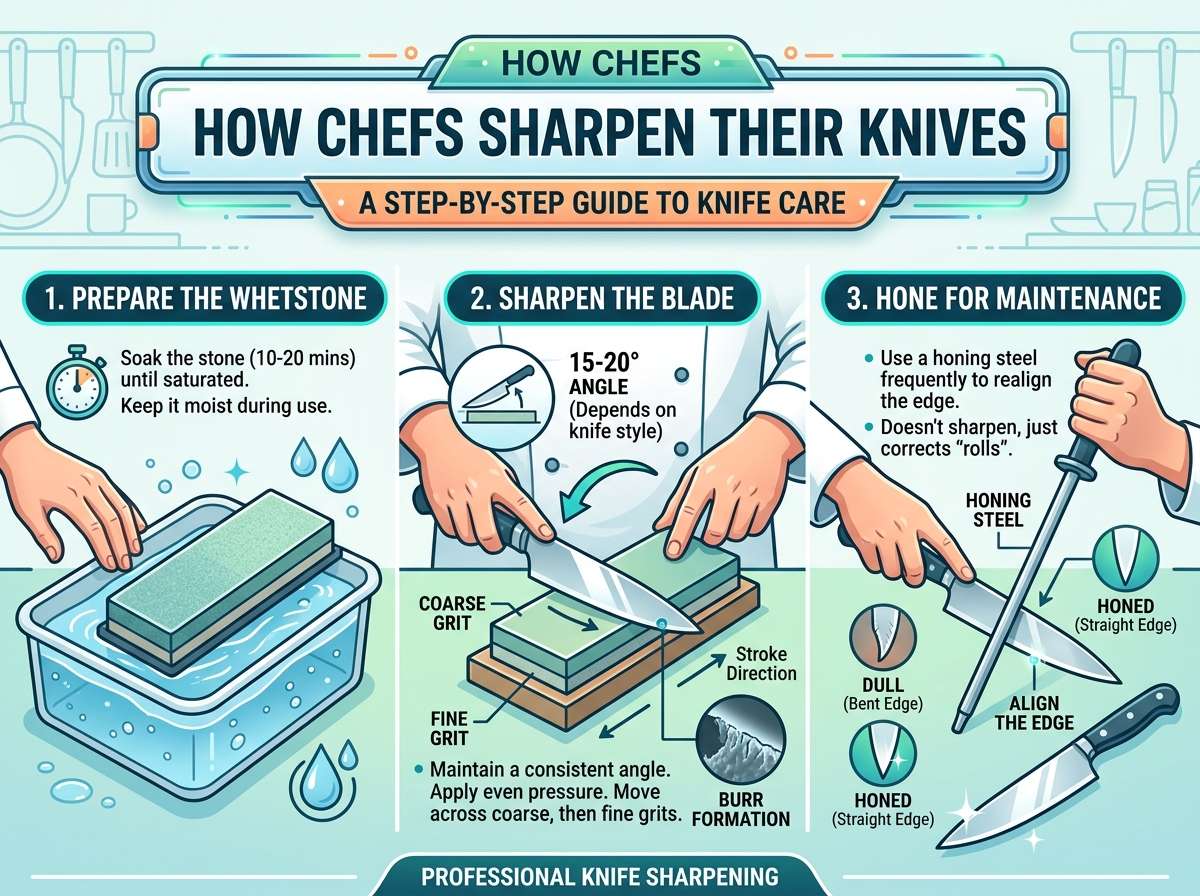
A honing steel is a rod, usually made of ceramic or steel. When you run your knife along it, you’re not removing metal. You’re straightening the edge. Think of the edge like tiny teeth that have bent to the side. The honing steel pushes those teeth back into line.
This feels like sharpening because your knife gets more effective. But nothing is being removed. The edge is still the same, just realigned.
A honing steel is fast and easy. You can do it in thirty seconds. Many chefs do it daily or even multiple times per shift.
Sharpening is different. Real sharpening removes metal from the blade. You’re creating a completely new, sharp edge. This takes longer. It requires the right equipment. But it actually fixes a truly dull blade.
Here’s how chefs think about it: honing keeps your knife performing well. Sharpening brings a dull knife back to life. You need both.
Using a Honing Steel Correctly
Since this is so common in kitchens, let’s talk about how to actually do it right.
A honing steel has a handle and a long rod. The rod is textured. You hold the steel vertically. Most people hold it up in front of their body or on a cutting board.
Now here’s the move. You place the knife blade against the rod at an angle. This angle matters. Most chef knives need about a 15-degree angle. This sounds precise, but it’s pretty forgiving. You’ll feel when it’s right.
The blade sits on the rod with the spine (the thick back edge) higher than the sharp edge. The tip of the knife points downward and slightly toward you.
Now you draw the knife downward and slightly backward. The edge moves from the base of the blade toward the tip. You do this in one smooth motion. Then you flip the knife and do the other side. Some people do five passes per side. Others do two or three.
That’s it. It takes a few seconds. Your knife is honed.
The key is keeping that angle consistent. If it wobbles or changes, you won’t hit the edge properly. But don’t stress about getting it perfect. Professional chefs do this almost without thinking. You’ll get there with practice.
The Art of Sharpening: Whetstones and Water Stones
Now we get to the real thing. True sharpening means using a whetstone or water stone.
A whetstone is a rectangular block. Usually it’s made of natural rock or ceramic material. Many are made from Japanese water stones. Others are made from aluminum oxide or other compounds. The stone has grit. The grit is what removes metal from the blade.
Coarser grits remove metal faster but leave a rougher edge. Finer grits take longer but create a sharper, more polished edge. Many chefs use two stones: a coarser one first, then a finer one to finish.
The process starts with water. You soak your stone or wet it thoroughly. The water keeps the stone from getting clogged. It also helps the blade slide smoothly. This is why they’re called water stones.
You place the stone on a flat surface. A towel under it helps keep it from sliding around. Now you place your knife on the stone at an angle. Again, that 15-degree angle is the target for most chef knives.
The blade needs to rest flat on the stone, edge first. The spine should be slightly off the stone. Now you push the knife away from your body. You move it straight back, not sideways. The entire blade travels across the stone, from hilt to tip. Then you bring it back toward you.
That’s one stroke. You repeat this. Five strokes, ten strokes, or however many it takes. You’re creating a new, sharp edge.
The first side gets attention until a new edge is formed. How do you know when it’s ready? Professionals look for a burr. This is a tiny edge of metal that forms on the back side of the blade. When you feel a burr, the edge is ready. Then you flip the blade and do the other side the same way.
Once both sides have a burr, you move to a finer stone. This polishes the edge and removes that burr. You use fewer strokes here. Twenty or thirty strokes instead of a hundred. The result is a truly sharp blade.
Motorized Sharpeners: The Quick Option
Not every chef loves whetstones. Some prefer motorized sharpeners. These machines are fast and consistent.
A motorized sharpener has spinning wheels or stones. You pull the knife through a slot and the machine does the work. It takes thirty seconds. Both sides get sharpened at once.
The downside is precision. These machines work at a set angle. If your knife needs something different, tough luck. Also, they remove metal faster. Your knife loses a little bit of its life each time.
Professional kitchens sometimes use motorized sharpeners for their workhorse knives. They also use them for maintaining their backups. But for their personal knives that they use all day? Most chefs still prefer whetstones or honing steels.
Pull-Through Sharpeners: The Controversial Option
These are the devices you see at home stores. You hold them in one hand and pull the knife through with the other. They’re cheap and simple.
Most professional chefs actively avoid these. They aren’t very good. They can damage your blade. The angle isn’t consistent. The results are unpredictable.
But here’s the honest truth: if you’re a beginner and have a dull knife right now, a pull-through sharpener beats a dull knife. It’s better than nothing. Just don’t expect professional results. And don’t use it on your best knives.
Diamond Stones: The Modern Alternative
Diamond stones are growing more popular. Instead of ceramic material, they use diamond dust. Diamond is incredibly hard, so it removes metal very quickly.
These stones are great if you have very dull knives or want the job done fast. They work well on German-style knives that are thicker and require more aggressive sharpening.
The downside is speed. They can remove too much metal if you’re not careful. A new cook could end up shortening the life of a great blade pretty quickly.
Professional chefs use them strategically. When a knife is really messed up, out comes the diamond stone. When it’s just maintenance, they stick with gentler options.
Electric Sharpeners: The Kitchen Gadget
These look fancy and promise easy results. They’re motorized like the pull-throughs but more substantial. You put the knife in a slot and let the machine work.
Some electric sharpeners are actually pretty good. High-end models create excellent edges. But they’re expensive. A really good electric sharpener costs serious money.
The problem is the same as motorized sharpeners: you lose flexibility. Your blade gets sharpened at the machine’s angle, not the angle your knife needs. Also, over time, your knives get slightly shorter as metal is removed.
Learning to Use a Whetstone: Step by Step
Let’s walk through the whole process so you can actually do this at home.
Step One: Get Your Supplies
You need a whetstone, water, a towel, and your knife. A beginner whetstone isn’t expensive. Spend thirty to fifty dollars on a decent two-sided stone. One side should be coarser, maybe 1000 grit. The other side should be finer, maybe 6000 grit.
Step Two: Prepare Your Stone
Soak the stone in water for ten to fifteen minutes. If it’s a water stone, this really matters. If it’s a diamond stone, you still want it wet, but soaking isn’t as critical. Once wet, put the stone on your towel. Make sure it won’t move.
Step Three: Find Your Angle
This is the hardest part for beginners. Place the knife on the stone with the spine up. The edge should touch the stone. Now start lifting the spine slightly. When it’s up about the thickness of a quarter, you’re at about 15 degrees. This is the magic angle for most knives.
Feel it. Once you have the angle, keep it constant.
Step Four: Sharpen the First Side
Place the heel of your blade (the part closest to the handle) on the stone. Now push the knife away from your body. As you push, move the knife along the stone from the heel toward the tip. The whole blade travels across the stone. Then pull it back. That’s one stroke.
Do ten to twenty strokes. Keep the angle the same. You’re creating a new edge.
Step Five: Check for the Burr
After several strokes, run your thumb very carefully along the back of the blade (the spine side, not the edge). You might feel a tiny ridge. That’s the burr. It means you’ve created an edge and pushed metal to the back. Once you feel this, move to the other side.
Step Six: Sharpen the Other Side
Flip the knife. Put the tip on the stone first this time. Push away from you. Pull back. Keep the angle the same. Do the same number of strokes you did on the first side. Again, look for that burr.
Step Seven: Switch to the Finer Stone
Now move to the finer side of your stone. This time, do fewer strokes. Maybe ten to fifteen per side. This polishes the edge and removes the burr.
Step Eight: Test Your Blade
Your knife should be genuinely sharp now. Test it on paper or a tomato. It should cut easily without pressure.
How Often Should You Sharpen?
This depends on use. A chef using a knife all day might sharpen once a week. A home cook who uses their knife a few times a week might sharpen once every two to three weeks.
A home kitchen probably needs sharpening every month or two if you cook regularly. If you barely use your knives, maybe twice a year is enough.
Don’t wait until your knife is useless. Sharpen while it’s just starting to get dull. This keeps you from having to do aggressive sharpening. It also keeps your knives in better shape longer.
Honing Between Sharpenings
This is the secret that separates professional results from amateur attempts.
Between major sharpenings, use a honing steel regularly. Many chefs hone every time they cook. You could do it every day. It takes five seconds and keeps your knife performing at its peak.
This means you sharpen less often. Your knives last longer. Your performance stays consistent.
Think of it this way: honing is maintenance. Sharpening is repair. You want to do lots of maintenance and minimal repair.
Common Mistakes to Avoid
Sharpening at the Wrong Angle
If your angle changes mid-stroke, you’re wasting time. The blade won’t sharpen evenly. Focus on consistency.
Using a Dry Stone
Water is essential. It keeps the stone clean and makes the blade glide. Never use a water stone dry.
Removing Too Much Metal
Aggressive sharpening feels good but hurts your knives long-term. Let the stone do the work. Don’t press hard. Light, consistent pressure is better.
Ignoring the Burr
Some people skip this step. The burr tells you when you’re done. Learn to feel for it.
Not Maintaining the Angle
This is the most common beginner mistake. The angle is everything. If it wavers, your edge won’t be consistent.
Professional Kitchen Secrets
Real chefs have tricks that home cooks don’t know.
Many keep their personal knife separate from the rest. They sharpen it themselves, carefully. The station knives that everyone shares get different treatment. Those might get motorized sharpening or pull-through devices because they’ll be replaced eventually anyway.
Chefs also keep their knives dry and clean. Water and dust damage the edge. Between uses, they wipe the blade on their apron. They store knives carefully, never just tossing them in a drawer.
Some chefs develop a relationship with a professional knife sharpener. These are people who sharpen knives as a job. They have serious equipment and lots of skill. For their best blades, a professional sharpening once a year might happen alongside personal maintenance.
The Best Angle for Different Knives
We’ve talked about 15 degrees, but not all knives are the same.
Japanese knives are often thinner and need a lower angle. Some work best at 12 to 15 degrees. German knives are thicker and tougher. They might prefer 18 to 20 degrees.
Your knife came with a specific design. Finding the angle the designer intended works best. If you’re not sure, 15 degrees is a solid default.
Invest in Quality Sharpening Tools
A cheap whetstone will frustrate you. It’ll be too soft and get damaged easily. A cheap honing steel might not actually do anything useful.
Spend real money on one good whetstone and one good honing steel. These will last you a lifetime. You’ll actually enjoy using them. Your knives will perform better. It’s worth it.
Creating Your Own Sharpening Routine
Now that you understand the options, build a routine that works for you.
If you cook a few times a week, here’s a simple plan: hone your knife before each cooking session. Every two weeks, spend thirty minutes sharpening on a whetstone. This keeps your knives perfect.
If you cook daily, hone every single time. Sharpen once a week. Your knives will be legendary.
If you barely use your knives, hone once a month and sharpen every few months. Still better than most home cooks.
The routine matters more than anything else. Consistency beats perfection.
Learning from Chefs
If you want to really master this, watch professionals do it. Many videos online show the exact technique. Watch how they hold the stone. See their arm movement. Notice their angle. Then practice.
The first time you get a true burr and move to a finer stone and create an edge so sharp it shaves your arm hair… you’ll understand why chefs care so much about this.
Practice Makes Perfect
Your first attempt at sharpening probably won’t be perfect. That’s completely normal. Even chefs in training need weeks to get good at this.
But the nice thing is you can’t really break anything. If your angle is a little off, the blade gets duller than it should. No harm. You just try again. Each attempt teaches you something.
After a few times, your hands will remember the angle. You’ll feel it automatically. The knife will stay perfect almost without thinking.
Why Chefs Take This So Seriously
At the end of the day, chefs sharpen knives because it matters for their food. A sharp knife makes better cuts. Better cuts mean better-looking food. They cook faster. They taste better because they’re cut correctly.
A chef’s knife is their most important tool. More important than any fancy equipment or trendy technique. A great knife lasts decades. It helps you cook better every single day.
Taking ten minutes to sharpen that knife is taking ten minutes to improve your cooking. That’s why they do it. That’s why you should too.
Getting Started Today
You don’t need fancy equipment. A basic whetstone and a honing steel will change your kitchen life. Your knives will perform better. Your cooking will be easier. Your fingers will be safer.
The skill takes practice but not talent. Anyone can learn this. The only requirement is a little patience and a willingness to spend a few minutes with a stone.
Your dull knives can become sharp again. Your next cooking experience can be faster and easier. All you need to do is start.
Pick up a whetstone. Watch a video. Try it. Your knives will thank you. So will your hands.
Final Thoughts
Sharp knives aren’t a luxury. They’re a basic requirement for good cooking. Professional chefs understand this completely. Now you do too.
The process isn’t mysterious or difficult. It’s just technique and practice. You can absolutely learn this. You should learn this.
Your kitchen deserves sharp knives. Your cooking deserves sharp knives. You deserve sharp knives.
So grab a stone and start practicing. In a few weeks, you’ll be wondering why you waited so long. Your food will taste better. Your prep will go faster. Your hands will be safer.
That’s the chef’s secret. That’s what professional kitchens have known forever. And now it’s your secret too.
Get sharpening.

Mary is a home cooking enthusiast and kitchen gear reviewer with a passion for practical cookware and food preparation tools. She enjoys testing cutting boards, knives, kitchen gadgets, and other cooking essentials to help home chefs make smarter buying decisions. Through KitchenCutting.com, Mary shares honest product reviews, buying guides, and helpful kitchen tips to make cooking easier, safer, and more enjoyable.
One Comment