How to Cut a Nectarine?
Nectarines are one of the best summer fruits out there. They are sweet, juicy, and packed with flavor. But if you have ever tried to cut one, you know it can get messy fast. The flesh is soft, the pit is stubborn, and the juice tends to run all over your cutting board.
In this article
The good news is that cutting a nectarine is actually simple once you know the right steps. In this guide, you will learn every method, from basic slicing to dicing for a fruit salad. No fancy tools are needed. Just a good knife, a cutting board, and a few minutes of your time.
By the end of this article, you will be able to cut a nectarine like a pro, keep the mess to a minimum, and get perfect slices every single time.
What Makes Nectarines Tricky to Cut
Nectarines belong to the stone fruit family, along with peaches, plums, and cherries. They all share one thing in common: a hard pit sitting right in the center of the fruit. This pit does not want to let go easily, and that is where most people run into trouble.
Unlike an apple or a pear, you cannot just slice straight through a nectarine without hitting that pit. So the trick is learning how to work around it, not through it. Once you get the hang of this, cutting a nectarine becomes second nature.
Another thing to keep in mind is ripeness. A nectarine that is too firm will be harder to cut cleanly, while one that is overripe might turn mushy under the knife. So the ripeness level actually changes how easy or hard the job is.
Tools You Will Need
You do not need anything fancy for this task. Here is a short list of what works best:
- A sharp paring knife or a small chef’s knife
- A sturdy cutting board
- A bowl for the slices
- A spoon (optional, useful for very ripe fruit)
- A kitchen towel to wipe your hands, since things can get juicy
A dull knife is actually more dangerous than a sharp one because it slips instead of cutting cleanly. So before you start, take a second to make sure your blade has a good edge.
Step 1: Wash the Nectarine First
Before any cutting happens, rinse the nectarine under cool running water. Nectarines have a fuzz-free, smooth skin, but they can still carry dirt, wax, or pesticide residue from the store or farm. Gently rub the skin with your fingers while rinsing.
After washing, pat it dry with a towel. A wet fruit is slippery, and a slippery fruit on a cutting board is a recipe for an accident. Dry hands and a dry fruit make the whole process safer and easier.
Step 2: Check for Ripeness
Ripeness matters a lot here, so give the fruit a gentle squeeze. A ripe nectarine should give slightly under light pressure, kind of like a ripe peach. If it feels rock hard, it needs a few more days on the counter. If it feels mushy or leaks juice when you press it, it is very ripe and will need extra care while slicing.
A ripe nectarine also tends to smell sweet near the stem area. That little sniff test can tell you a lot before you even pick up the knife.
Step 3: Find the Seam Line
Look closely at the nectarine and you will notice a natural seam running from the top, where the stem was, down to the bottom. This line is your guide. The pit sits right underneath this seam, so cutting along it helps you avoid smashing into the stone.
This seam is the same feature you would look for on a peach or a plum, so once you learn to spot it, cutting any stone fruit gets easier.
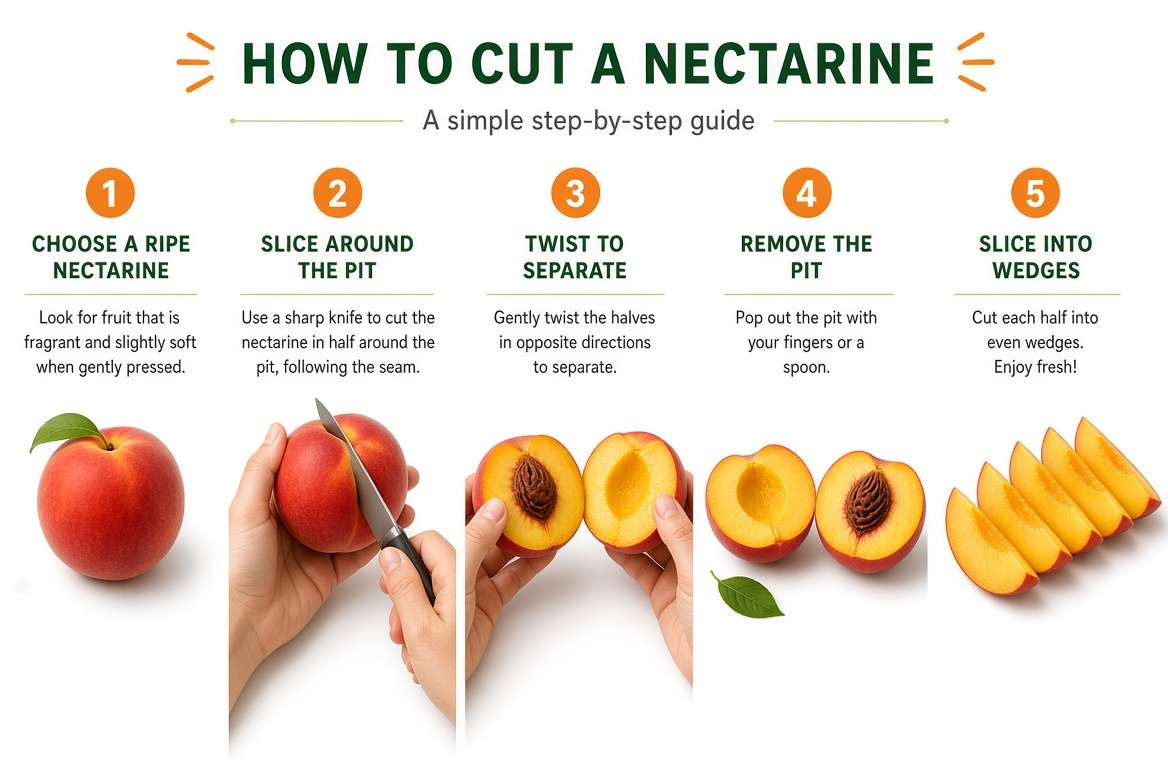
Step 4: Slice Around the Pit
Now for the main event. Hold the nectarine firmly in one hand, with the stem side facing up. Place your knife at the top of the seam line and cut straight down toward the bottom, letting the blade follow the curve of the fruit until it touches the pit.
Rotate the nectarine slowly as you cut, keeping the knife against the pit the whole time. Think of it like tracing a circle around a small ball sitting inside the fruit. Once you have gone all the way around, you will have cut the nectarine into two halves that are still connected by the pit.
Gently twist the two halves in opposite directions, like you are opening a jar. One half should pop away cleanly, leaving the pit stuck in the other half.
Step 5: Remove the Pit
For the half still holding the pit, you have a few options depending on how ripe the fruit is.
For firmer nectarines: Use the tip of your knife to carefully pry around the edge of the pit, then lift it out with your fingers or the knife tip.
For very ripe nectarines: A spoon works better here. Slide the spoon under the pit and scoop it out gently, since the flesh is soft and a knife might tear it apart.
Another simple trick: Cut a small X shape into the flesh right around the pit, then use your fingers to pop it loose. This method works well when the fruit is somewhere between firm and soft.
Once the pit is out, you now have two clean nectarine halves ready for the next step.
Step 6: Slice or Dice Based on What You Need
This is where things get flexible, since the way you cut the nectarine depends on how you plan to use it.
For Wedges (Great for Snacking or Salads)
Place each half flat-side down on the cutting board. Cut each half into three or four wedges, depending on how thick you want them. This shape works great for fruit salads, tossing on top of yogurt, or just eating straight off the board.
For Slices (Great for Tarts or Pancakes)
Lay each half flat-side down again, then cut thin, even slices across the width. Thin slices look nice when arranged on a tart, folded into pancake batter, or layered on toast with a bit of honey.
For Dice (Great for Salsa or Baking)
Cut the wedges or slices again in the other direction, turning them into small cubes. Diced nectarine works well in salsa, mixed into oatmeal, or baked into muffins.
For Fans (Great for Plating)
If you want something that looks fancy without much effort, cut thin slices but stop just before reaching the top of the wedge, keeping the pieces attached at one end. Fan them out gently on a plate for a nice presentation at brunch or a dinner party.
A Faster Method: The Cross-Cut Technique
If you are in a hurry, there is a quicker way to handle a nectarine, especially if you plan to peel it or cook it right after.
- Cut the nectarine in half using the seam-line method described above.
- Remove the pit using whichever trick suits the ripeness of your fruit.
- Lay each half flat-side down.
- Make vertical cuts across the flesh without cutting through the skin.
- Make horizontal cuts the same way, creating a checkerboard pattern.
- Push the skin side up, like turning a sock inside out, and the cubes will pop up neatly. Slice them off the skin with your knife.
This method is popular with mangoes too, and it works nicely for nectarines when you want quick, even cubes without much fuss.
Do You Need to Peel a Nectarine?
Not really. Nectarine skin is thin, smooth, and completely edible. Most people eat nectarines skin-on, just like an apple. The skin actually holds a good amount of fiber and nutrients, so leaving it on is usually the better choice.
That said, some recipes call for peeled fruit, especially baked goods like pies or jams where a smooth texture is preferred. If you need to peel it, here is an easy trick:
- Bring a pot of water to a boil.
- Cut a small X on the bottom of the whole nectarine.
- Drop it into the boiling water for about 20 to 30 seconds.
- Pull it out and place it into a bowl of ice water right away.
- The skin should slide right off after this quick shock treatment.
This blanching trick is the same one used for tomatoes and peaches, so it is worth knowing if you cook often.
Common Mistakes to Avoid
A few small mistakes can turn this simple task into a frustrating one. Here is what to watch out for:
- Using a dull knife. It slips more than a sharp one and makes clean cuts harder to achieve.
- Cutting straight through the pit. This wastes fruit and dulls your blade fast.
- Skipping the seam line. Cutting randomly instead of following the seam makes it much harder to separate the halves cleanly.
- Rushing with overripe fruit. Very soft nectarines need gentler handling, so slow down and use a spoon instead of forcing a knife through them.
- Forgetting to wash the fruit first. Skin residue can end up on the flesh once you start cutting.
How to Keep Cut Nectarines Fresh
Once sliced, nectarine flesh starts to turn brown fairly fast because of oxidation, the same reaction that happens with apples and pears. Here are a few easy ways to slow this down:
- Squeeze a little lemon or lime juice over the slices. The citric acid slows browning and adds a nice bright flavor too.
- Store the slices in an airtight container in the fridge and eat them within a day or two for the best taste and texture.
- If you want to freeze them, lay the slices flat on a tray first so they do not stick together, then transfer them to a freezer bag once frozen solid.
- Avoid leaving cut nectarine sitting out at room temperature for long stretches, since warmth speeds up both browning and spoilage.
Nectarine vs Peach: A Quick Note
People often ask if cutting a nectarine is different from cutting a peach. The truth is, the process is almost identical. The biggest difference between the two fruits is the skin. Peaches have a fuzzy coat, nectarines do not. Beyond that, both are stone fruits with a pit in the center, and both respond well to the seam-line cutting method described above.
So if you already know how to handle a peach, you basically already know how to handle a nectarine too.
Creative Ways to Use Your Cut Nectarines
Now that your nectarine is cut, here are a few tasty ideas to try:
- Toss wedges into a green salad with feta cheese and a light vinaigrette.
- Grill nectarine halves for a few minutes to bring out a smoky, caramelized flavor.
- Blend diced nectarine into a smoothie with yogurt and a handful of spinach.
- Layer slices over a bowl of oatmeal or granola for a naturally sweet breakfast.
- Mix diced nectarine with red onion, cilantro, and lime juice for a fresh summer salsa.
- Bake wedges into a simple crisp or cobbler with a bit of cinnamon and oats on top.
Nectarines pair nicely with almonds, basil, honey, cinnamon, and soft cheeses like burrata or ricotta, so feel free to experiment.
Frequently Asked Questions
Do I need a special knife to cut a nectarine? No, a regular paring knife or small chef’s knife works just fine. The key is sharpness, not size.
Why is my nectarine so hard to cut? It is likely underripe. Firm nectarines resist the knife more than ripe ones. Let it sit on the counter for a day or two before trying again.
Can I cut a nectarine without removing the pit? Not really, since the pit is hard and sits right in the middle. You need to work around it using the seam-line method.
What is the seam line on a nectarine? It is the thin natural crease running from the stem down to the bottom of the fruit. It marks the shortest path around the pit.
Can I eat nectarine skin? Yes, it is thin, soft, and fully edible. Peeling is only needed for certain recipes.
How long do cut nectarines last in the fridge? About one to two days when stored in an airtight container with a bit of lemon juice added.
Is a nectarine a type of peach? No, they are close cousins from the same stone fruit family, but they are separate fruits. The main visible difference is the smooth skin on a nectarine versus the fuzzy skin on a peach.
Final Thoughts
Cutting a nectarine does not have to be a messy struggle. Once you learn to find the seam line, cut around the pit instead of through it, and adjust your technique based on ripeness, the whole process becomes quick and almost automatic.
Whether you are prepping a fruit salad, making a smoothie, or just want a healthy snack, a well-cut nectarine makes life easier and the fruit far more enjoyable to eat. So grab a nectarine, sharpen your knife, and give this method a try. After the first one or two tries, it will feel completely natural, and you will never dread cutting a nectarine again.

Mary is a home cooking enthusiast and kitchen gear reviewer with a passion for practical cookware and food preparation tools. She enjoys testing cutting boards, knives, kitchen gadgets, and other cooking essentials to help home chefs make smarter buying decisions. Through KitchenCutting.com, Mary shares honest product reviews, buying guides, and helpful kitchen tips to make cooking easier, safer, and more enjoyable.