How to Use a Knife Sharpener in Block?
A dull knife is not just annoying. It is also unsafe. When a blade is dull, you have to push harder to cut through food, and that extra force is what causes most kitchen cuts. A sharp knife glides through tomatoes, onions, and meat with almost no effort. This is why so many home cooks now keep a knife sharpener in block form right next to their cutting board.
In this article
If you just bought one of these handy tools, or you got one as a gift and it is still sitting in the box, this guide will walk you through everything step by step. No fancy terms, no confusing instructions. Just plain, easy steps anyone can follow, even if you have never sharpened a knife in your life.
What Is a Knife Sharpener in Block?
A knife sharpener in block is a small tool, usually made of wood, plastic, or metal, with narrow slots cut into it. Each slot holds a pair of sharpening wheels, ceramic discs, or diamond-coated rods set at a fixed angle. You simply pull your knife through the slot, and the wheels or rods scrape away tiny bits of metal from the edge, giving you a fresh, sharp blade.
This tool is often called a pull-through sharpener because of the motion you use. It is different from a whetstone, which needs you to hold the knife at the right angle by hand. With a block sharpener, the angle is already set for you, so beginners find it much easier to use.
Most block sharpeners come with two or three slots:
- A coarse slot for very dull or damaged blades
- A medium or fine slot for regular touch-ups
- A honing or stropping slot to polish the edge and remove tiny burrs
Some blocks combine all of these into one compact unit, while others separate them into different stages. Either way, the basic idea stays the same.
Why Use a Block Sharpener Instead of Other Tools
There are many ways to sharpen a knife. You can use a whetstone, an electric sharpener, a honing rod, or send your knives to a professional. So why do so many people prefer the block style?
First, it is fast. You do not need to soak stones in water or set up a workstation. Just place the block on your counter and start pulling the knife through the slots.
Second, it is beginner friendly. Since the angle is fixed, you do not have to guess or worry about ruining your blade with an uneven edge. This makes it a great starting point for anyone who feels nervous about sharpening knives by hand.
Third, it is compact and easy to store. Unlike bulky electric sharpeners, a block sharpener fits in a drawer or sits neatly on your counter without taking up much space.
Of course, it also has some limits. It removes more metal than a whetstone would for the same job, so heavy daily use can wear down your blade faster over time. But for most home cooks, this trade-off is worth the convenience.
Getting Ready Before You Start
Before you even touch the sharpener, take a moment to prepare. This small step makes a big difference in how well the process goes.
Clean your knife first. Wipe off any food, oil, or grease from the blade. A dirty blade can clog the sharpening slots and reduce how well they work.
Check the blade type. Most block sharpeners work great on straight-edge stainless steel knives. If you own a serrated bread knife or a specialty Japanese knife with a very thin edge, check the sharpener’s instructions first, since not all tools are made for those blade styles.
Find a stable surface. Place the sharpener block on a flat countertop or table. Some blocks have rubber feet on the bottom to stop them from sliding, but it still helps to place them on a non-slip mat or towel if your counter is smooth.
Have a towel nearby. Sharpening can create small metal shavings, and having a towel ready lets you wipe the blade clean between passes.
Step-by-Step Guide to Using a Knife Sharpener in Block
Now let’s get into the actual process. Follow these steps in order, and take your time, especially if this is your first attempt.
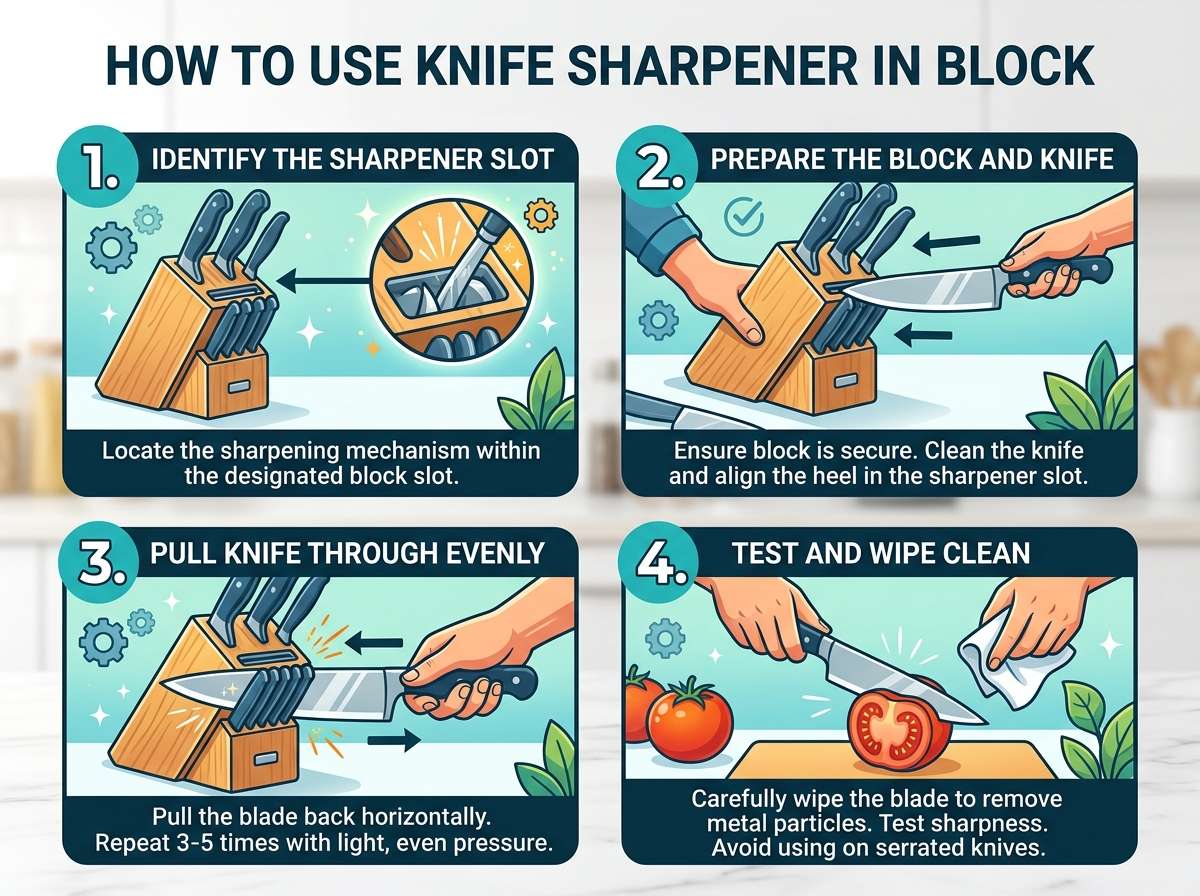
Step 1: Hold the Block Steady
Place your non-dominant hand flat on top of the sharpener block, or hold the handle if it has one. Keeping it steady is important because any wobble during sharpening can lead to an uneven edge or an accidental slip.
Step 2: Start With the Coarse Slot (If Your Blade Is Very Dull)
If your knife has not been sharpened in a long while, or the edge feels rough and chipped, start with the coarse slot. This is usually marked with a number one or a symbol showing thicker lines.
Place the heel of the knife (the part closest to the handle) into the slot. Apply light, steady pressure downward, just enough that you feel the blade making contact with the sharpening wheels or rods.
Step 3: Pull the Knife Through Smoothly
Slowly pull the knife toward you, moving from the heel to the tip in one smooth motion. Do not rush this part. A slow, controlled pull gives a much better result than a fast, jerky one.
Try to keep the pressure even throughout the whole pull. If you push too hard at the start and ease off near the tip, your edge will end up uneven.
Step 4: Repeat Three to Five Times
For a very dull blade, pull the knife through the coarse slot about three to five times. You do not need to press hard each time. Let the tool do the work; your job is just to guide the blade smoothly and evenly.
Step 5: Move to the Medium or Fine Slot
Once the coarse stage is done, move to the next slot, usually labeled as fine or medium. This stage refines the edge that the coarse slot created, smoothing out any rough spots left behind.
Repeat the same pulling motion here, but this time only two to three passes are usually enough.
Step 6: Finish With the Honing Slot
If your sharpener has a third slot for honing or stropping, this is your final step. It polishes the blade and removes tiny metal burrs left behind by the earlier stages, giving you a cleaner, sharper finish.
One or two gentle passes through this slot is all it takes.
Step 7: Wipe the Blade Clean
After sharpening, wipe the blade with a damp cloth to remove any metal dust or shavings. This step matters more than people think, since leftover metal particles can end up on your cutting board or in your food if skipped.
Step 8: Test the Sharpness
Once your knife is clean and dry, test its sharpness safely. A common trick is the paper test: hold a sheet of printer paper by one edge and try slicing through it. A sharp knife will glide through with a clean cut, while a dull one will tear or snag the paper.
Another gentle way to test is by lightly running the blade across a tomato skin. A properly sharpened knife should slice in with almost no pressure at all.
Common Mistakes to Avoid
Even with a simple tool like this, a few common errors can affect your results. Here is what to watch out for.
Pulling the knife back and forth. Some people think moving the blade back and forth through the slot will sharpen it faster. In reality, this can damage the edge and wear down the sharpening wheels faster than needed. Always pull in one direction, from heel to tip.
Using too much pressure. More force does not mean a sharper edge. In fact, pressing too hard can chip the blade or create an uneven angle. Let the fixed slot angle and gentle pressure do the work.
Skipping the fine or honing stage. Jumping straight to the coarse slot and stopping there leaves the blade rough and uneven. Always move through each stage in order for the best result.
Sharpening a wet blade. Moisture can cause the blade to slip inside the slot, which is both unsafe and ineffective. Always dry your knife before placing it in the sharpener.
Using it on the wrong blade type. As mentioned earlier, serrated edges and some specialty blades are not made for pull-through sharpeners. Using one on these knives can damage the teeth or the delicate edge.
Sharpening too often. Daily sharpening is rarely needed. Most kitchen knives only need a touch-up every couple of weeks with regular use, and a full sharpening session much less often than that. Over-sharpening wears down the blade faster and shortens its lifespan.
How Often Should You Sharpen Your Knife
This depends on how often you cook and what kind of cutting board you use. Wooden and plastic boards are gentler on blades, while glass or stone boards dull them much faster.
For an average home cook using their knife daily, a light touch-up through the fine slot every one to two weeks keeps the edge in good shape. A full sharpening session, starting from the coarse slot, is usually only needed every few months, or whenever the blade feels noticeably dull.
A good habit is to hone your knife lightly before each use and save the full sharpening for when you actually notice resistance while cutting.
Tips to Get the Best Results
Here are a few extra tips that can make a real difference in how your sharpener performs over time.
Keep the sharpener block itself clean. Small bits of metal and food debris can build up in the slots over time. Wipe it down with a dry cloth after each use, and check the manufacturer’s instructions to see if it can be rinsed with water.
Store the sharpener in a dry place. Moisture can cause rust on the sharpening wheels, especially if they are made of carbide or steel rather than ceramic or diamond coating.
Match your knife to the right slot. Pushing a thick blade into a slot meant for thin blades, or the other way around, can lead to poor results or damage.
Replace the sharpener when it stops working well. Over time, the wheels or rods inside the slots wear down and lose their grit. If your knife no longer feels sharp after a normal sharpening session, it might be time for a new tool.
Combine tools for the best edge. Many experienced cooks use a block sharpener for quick, regular touch-ups and a whetstone occasionally for a deeper, more precise sharpening. This combo gives you speed most days and precision when you need it.
Safety Reminders
Sharpening tools involve a blade, so a few safety habits go a long way.
Always keep your fingers away from the slot opening while pulling the knife through. Hold the handle firmly and guide the blade with your wrist, not your fingers near the edge.
Work on a flat, stable surface so the block does not shift while you are pulling the knife.
Keep children and pets away from the area while sharpening, since loose metal shavings and a freshly sharpened blade are not things you want them near.
After sharpening, store your knife properly in a block, sheath, or magnetic strip rather than tossing it loosely into a drawer. A sharp edge left uncovered can easily nick fingers reaching into the drawer later.
Final Thoughts
A knife sharpener in block form is one of the easiest tools to add to your kitchen routine. It takes the guesswork out of sharpening, keeps a fixed angle for you, and gets your blade back to a clean, sharp edge in just a few minutes. Once you get used to the coarse, fine, and honing stages, the whole process becomes second nature.
Keep your blade clean, dry, and stored safely, sharpen only as often as needed, and always pull the knife through in one smooth direction. With just a little practice, you will find that maintaining sharp, reliable kitchen knives is far simpler than it seems, and your cooking will feel faster and safer because of it.

Mary is a home cooking enthusiast and kitchen gear reviewer with a passion for practical cookware and food preparation tools. She enjoys testing cutting boards, knives, kitchen gadgets, and other cooking essentials to help home chefs make smarter buying decisions. Through KitchenCutting.com, Mary shares honest product reviews, buying guides, and helpful kitchen tips to make cooking easier, safer, and more enjoyable.