How to Make a Cutting Board?
Want to build your own cutting board? You’re in for a treat. Making a cutting board is one of the best woodworking projects you can start with. It’s fun, practical, and totally doable even if you’ve never touched a power tool before. In this guide, we’ll walk you through every step of the process. By the end, you’ll have a beautiful handmade cutting board you can use in your kitchen or give as a gift.
In this article
Why Make Your Own Cutting Board
Store-bought cutting boards work fine. But there’s something special about making one yourself. When you build a cutting board at home, you get to pick the exact wood type you want. You can choose your favorite colors and grain patterns. You can make it the perfect size for your kitchen. Plus, making a cutting board costs way less than buying high-end ones at stores.
A homemade cutting board makes an amazing gift too. People love getting personalized kitchen items. Your friends and family will think about you every time they use it.
The best part? This project doesn’t require a lot of fancy equipment. You can make a great cutting board with basic tools you might already have at home.
What You’ll Need to Get Started
Before we jump in, let’s talk about the tools and materials you’ll need. Don’t worry if you don’t have everything yet. Most of these items are cheap and easy to find.
Tools for Making a Cutting Board
You’ll need a few basic tools to get going. A circular saw or miter saw works great for cutting your wood pieces. If you don’t have one, a hand saw will work too, but it takes longer.
A table saw is super helpful for ripping boards to width. Again, you can use a hand saw, but a power saw makes the job easier. You’ll also want a jointer or hand plane to flatten your wood.
You need a sander or sandpaper to smooth everything down. Start with rough grit paper like 80 or 100. Move up to finer grits like 150, 220, and 320 for a silky finish.
A router is great for rounding the edges, but a block plane or even sandpaper can do the job if you don’t have one. You’ll need wood glue for joining pieces together. A mallet or hammer helps if you’re using wooden pegs.
A drill will be helpful for making holes if you want to add wooden handles or decorative elements. Clamps are essential for holding pieces while the glue dries. Get at least four good clamps.
Measuring tools like a tape measure, square, and pencil are a must. You need these to mark out your cuts. A finish sander is nice but optional.
Materials You’ll Need
The most important material is the wood itself. Let’s talk about that in the next section.
You’ll also need wood glue that’s food-safe. Your hardware store has options. The glue dries clear and creates a strong bond.
Sandpaper in different grits is essential. Get a variety pack so you have options. You’ll go through more than you think.
For finishing, you need a food-safe mineral oil or beeswax. This protects your board and keeps it looking beautiful. Never use polyurethane or varnish on a cutting board that touches food.
If you want wooden pegs for decoration, you can buy them or make them from wood dowels. Some people add rubber feet to the bottom to keep the board from sliding around.
Picking the Right Wood for Your Cutting Board
Wood selection is crucial for a great cutting board. Not all wood types work equally well.
You want a hardwood that’s dense and tight-grained. Hardwoods are harder on knife blades, which means your knives stay sharp longer. Tight grain doesn’t splinter easily, and it’s easier to keep clean.
Maple is the gold standard for cutting boards. It’s super hard, has a light color, and feels great to use. Professional chefs and restaurants use maple cutting boards all the time.
Walnut is another excellent choice. It’s darker and has beautiful grain patterns. It’s still plenty hard and durable. Walnut boards look stunning in a modern kitchen.
Cherry wood works too. It has a nice reddish tone and ages beautifully. It’s not quite as hard as maple or walnut, but it’s still a solid option.
Teak is fantastic if you can find it. It’s naturally oily and resists water damage. It also resists bacteria growth better than some other woods.
Avoid softwoods like pine and fir. They dent easily, splinter quickly, and don’t hold up well to repeated knife cuts. Softwoods are cheap, but they’re not worth it for a cutting board.
Also skip woods that are toxic. Never use pressure-treated wood or any wood with chemical coatings. Your food touches this board, so stick with safe, natural wood.
Buy your wood from a lumber supplier or hardware store. Get boards that are already dried and milled. This saves you tons of work compared to starting with rough-sawn lumber.
Planning Your Cutting Board Design
Before you cut anything, take time to plan. A good plan makes everything easier.
First, decide on your board’s size and shape. A basic rectangular board works great for most people. Standard sizes range from 12 by 18 inches to 18 by 24 inches. Pick a size that fits your kitchen and your needs.
Some people like square boards. Others make oval or round boards for a fancy look. Stick with simple shapes for your first board. Straight lines are easier to cut and sand.
Next, think about thickness. For a cutting board, one and a half inches to two inches is ideal. This thickness gives you a sturdy, stable board that won’t flex too much when you’re cutting.
Now decide if you want a simple single-wood board or a striped design. A solid board is easiest. You just need one type of wood. A striped board uses alternating wood types for a cool look. Striped boards take more work but look amazing.
If you want stripes, pick two contrasting wood colors. Light maple with dark walnut looks beautiful. So does cherry with maple.
Draw your design on paper. Include measurements and wood selections. This guide helps you stay on track while building.
Think about adding feet or handles. Rubber feet on the bottom stop the board from sliding when you’re using it. A handle makes the board easier to carry.
Preparing Your Wood
Now the real work begins. You need to get your wood ready for assembly.
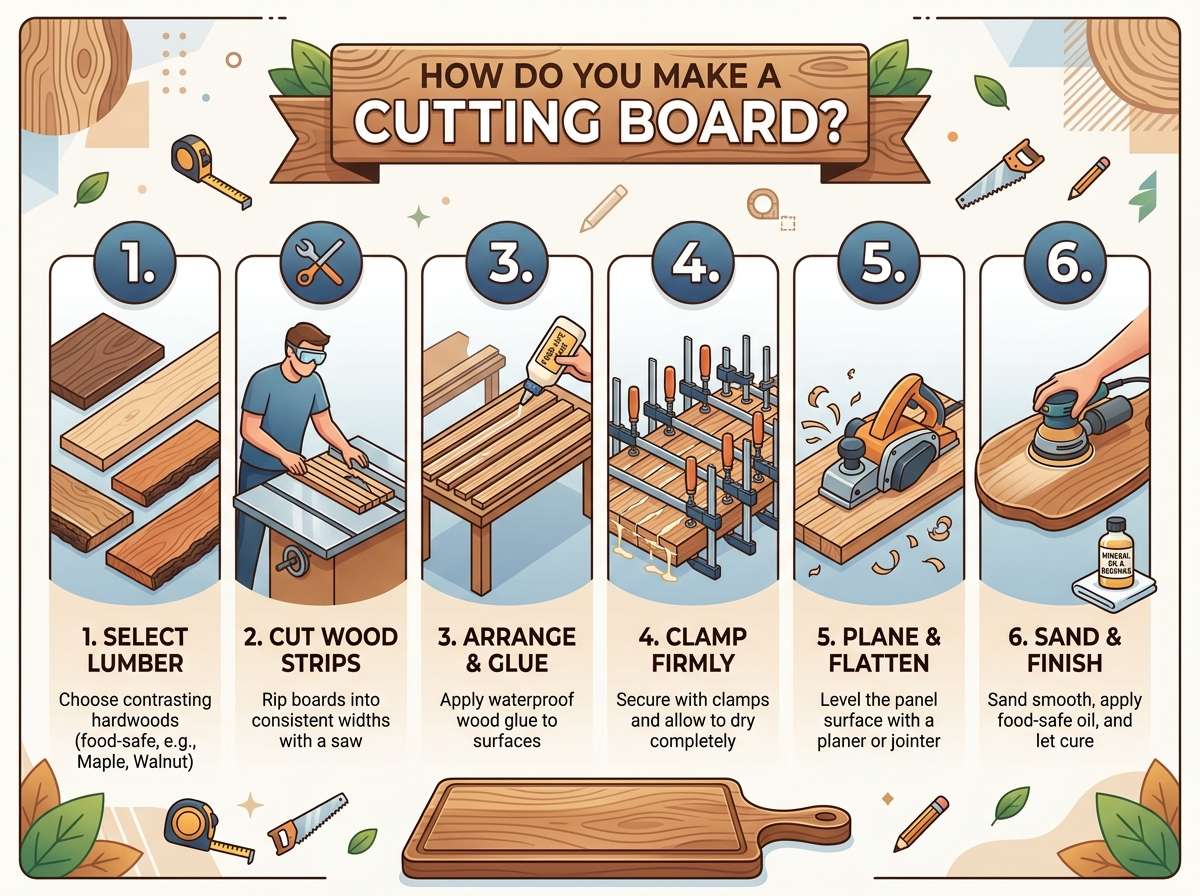
Start by checking that your wood is truly dry. Wood that’s too wet will warp and crack as it dries. Most lumber suppliers sell kiln-dried wood, which is ready to go. If you’re not sure, buy it from a reputable supplier.
Cut your wood pieces to the right length. Measure twice, cut once. This old saying is true. Mark your cuts with a pencil and use a straight edge to guide your saw.
Use your saw to rip the pieces to the right width. If you’re making a striped board, cut multiple strips of different woods. All strips should be the same width so they line up nicely.
Sand each piece before you assemble them. Start with 80 or 100 grit sandpaper. This removes any rough spots and makes the surfaces flat. Work your way up to 150 or 220 grit.
Don’t skip the sanding step. It makes assembly easier and gives you a better final product. Smooth wood glues together better than rough wood.
Check that all your pieces are flat. Place them on a flat surface and look for gaps. Twisted or warped pieces won’t glue together properly. If you find warped pieces, run them through a planer or hand plane to flatten them.
Gluing Your Cutting Board Together
This is the fun part. You’re putting it all together now.
Lay out all your pieces in the order you want them. If you’re making a striped board, alternate the wood types. Stand back and look at the arrangement. Make sure the grain patterns look good together.
Apply wood glue to the edges of the first piece. Use a brush or a thin stick to spread it evenly. Don’t use too much glue. Just enough to coat the edge. Too much glue makes a mess and can stain your wood.
Press the next piece against it. Apply glue to that piece’s edge and add the third piece. Keep going until all your pieces are together.
Now clamp everything tight. Place clamps every six inches or so along the length. Tighten each clamp gradually. Don’t jerk one clamp super tight. Go around and tighten all of them a little at a time. This applies even pressure across the whole board.
Wipe away extra glue with a damp rag right away. Dried glue is hard to remove later. Check that all the pieces are lined up evenly. They should be flush on the top and bottom.
Leave the board clamped for at least four hours. Most wood glues cure fully in 24 hours, so overnight is best. Don’t rush this step. Weak glue joints cause problems later.
Flattening and Shaping Your Board
Once the glue is dry, remove the clamps. Your board is one solid piece now.
Check that the top surface is flat. Run your hand across it. You should feel a smooth, even surface. If there are high spots where pieces don’t line up perfectly, you need to flatten.
Use a hand plane or a belt sander to flatten the surface. A hand plane gives you control and doesn’t remove too much material. A belt sander is faster but takes practice. Start in the middle and work toward the edges.
Sand the entire board smooth. Start with 80 grit if you have big ridges to remove. Move to 120 grit, then 150, then 220. With each finer grit, the board gets smoother. At 220 grit, it’ll feel silky.
Now shape the edges. Rounding the edges makes the board safer and feel better in your hands. A router with a round-over bit makes this easy. Pass the router along each edge once or twice.
If you don’t have a router, use a block plane or sandpaper. Work at a 45-degree angle along the edges. This creates a slight bevel that rounds the sharp corners.
Do the same thing to the bottom edges. You want a consistent look all around.
Sand the edges smooth with fine-grit sandpaper. You’re aiming for edges that feel smooth and safe.
Adding Handles and Feet
Handles and feet are optional, but they make your board better to use.
For handles, drill holes near the corners or along one end. Make the holes big enough that your fingers fit through comfortably. Sand the inside of each hole smooth.
You can leave the holes as is for a minimalist look. Some people insert wooden pegs or handles they buy.
For feet, get some rubber bumpers or wooden feet from a hardware store. Attach them to the bottom corners with screws. Make sure the feet are even so your board sits flat on the counter. The feet should be thick enough that they protect the wood from water and moisture.
Finishing Your Cutting Board
Finishing is crucial. It protects the wood and makes it look amazing.
Never use varnish, polyurethane, or any synthetic finish on a cutting board that touches food. These finishes aren’t safe to eat around. They can chip off into your food.
Instead, use food-safe mineral oil or beeswax. These natural finishes protect the wood without creating a plastic coating.
Mineral oil soaks into the wood and brings out the grain. It gives the wood a warm, natural look. Use food-safe mineral oil from the grocery store or a woodworking supplier.
Apply mineral oil liberally to the wood. Rub it in with a cloth. Let it soak in. After 15 minutes, wipe off any extra oil. The wood will drink it up.
Apply oil every few weeks if you use your board often. This keeps the wood protected and looking beautiful.
Beeswax creates a harder finish than mineral oil alone. Mix beeswax with mineral oil to make a paste. Rub this paste all over the board. Buff it with a cloth to bring out the shine.
A beeswax finish lasts longer than mineral oil alone. But you need to reapply it less often. Once or twice a year is enough.
Some people use a combination. They oil the board first, then apply a beeswax finish on top. This gives you the best of both worlds.
Never soak your cutting board in water. Water makes wood swell and warp. Wipe it clean with a damp cloth and dry it right away.
Caring for Your Cutting Board
Your new board will last for years with proper care.
After each use, rinse it with water and wash it with soap and a soft brush. Dry it immediately with a cloth. Don’t let it sit wet.
Once a month, oil the board. This keeps the wood from drying out and cracking. Just use mineral oil and a cloth.
Never put it in the dishwasher. The heat and water damage the wood and break down the finish. Always hand wash.
Keep your board away from direct heat. Don’t leave it in the sun. Don’t set it right next to the stove. Extreme heat and cold cause wood to expand and contract, which creates cracks.
Store it flat on a shelf or in a cabinet. Don’t lean it against a wall. Leaning creates stress on the wood that can lead to warping.
If your board gets a stain or discoloration, don’t worry. Sand it lightly with fine-grit sandpaper. The stain usually comes right off.
If you notice water stains, oil the board. The oil darkens the wood slightly, which can help hide old stains.
Troubleshooting Common Problems
Even experienced woodworkers run into issues. Here’s how to fix common problems.
If your pieces didn’t glue evenly, leaving ridges on the surface, sand it flat. Start with coarser sandpaper if the ridges are big. Sand until the surface is smooth and even.
If glue squeezed out between joints and you didn’t wipe it away, you can sand it off. The glue won’t take stain, but it cleans off with sanding.
If your board warped after you finished, it probably got wet or sat in direct sun. Make sure you oil it regularly going forward. Keep it away from heat and humidity.
If your board has a crack, don’t panic. Small surface cracks are cosmetic. They happen as wood naturally expands and contracts. Sand them smooth and oil the board.
Bigger structural cracks that go deep are more serious. If the crack is small, fill it with wood filler or epoxy. Sand smooth and oil.
If your knife gets stuck or catches when you cut, the surface might have gotten rough. Sand it smooth again with 220-grit paper. Oil afterward.
If your board smells weird, it might have absorbed odors. Wash it with soap and water. Oil it. The smell usually goes away. Wood naturally absorbs and releases odors over time.
Different Cutting Board Styles You Can Make
Once you master the basic board, try different styles.
A bread board is similar but has a well around the edge to catch crumbs. It’s handy for serving bread.
A butcher block has extra thickness and a really sturdy construction. It can handle heavy chopping.
A serving board has one fancy edge and is more decorative. Use it to serve cheese, meat, or appetizers.
A small knife block board has a slot for storing your knife. The knife sits upright in the board.
A hanging board has a hole for mounting on the wall. It saves counter space.
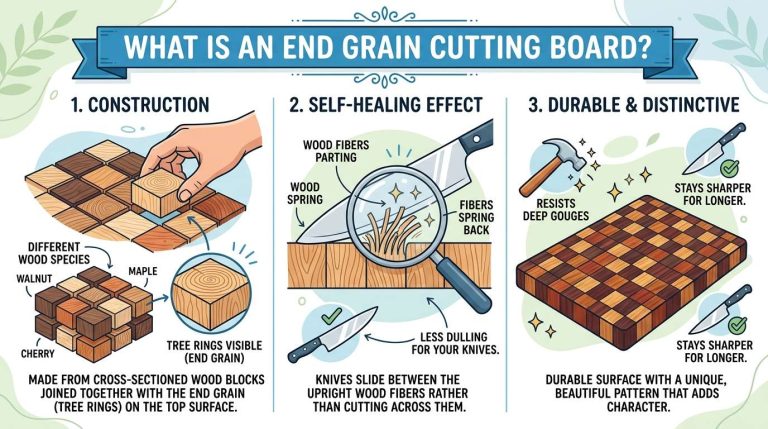
An end grain board is the fanciest kind. It’s made by gluing blocks together with the end grain facing up. These boards are gorgeous but harder to make.
A decorative inlay board has contrasting wood inserted into designs. This takes more skill but looks stunning.
Cost of Making a Cutting Board
Let’s talk about money. How much does it cost to build your own?
Wood usually costs between 10 and 30 dollars depending on what you pick and how big you go. Fancy woods cost more, but you don’t need much.
Wood glue is cheap. A bottle costs 5 to 10 dollars and lasts forever.
Sandpaper costs maybe 10 to 15 dollars for a good variety pack.
Finish costs 10 to 20 dollars depending on what you choose.
If you already have tools, your total cost is around 50 dollars. Even if you need to buy some tools, you’re looking at way less than a high-end store-bought board.
Skills You’ll Learn
Making a cutting board teaches you valuable woodworking skills.
You’ll learn how to select and prepare wood. You’ll get comfortable measuring and marking. You’ll practice using saws and sanders. You’ll understand wood glue and clamping. You’ll learn how to finish wood properly.
These skills transfer to other projects. Once you’ve made a cutting board, you can try simple shelves, boxes, serving trays, or small tables.
Woodworking is a rewarding hobby. Start with a cutting board and build from there.
Perfect Gifts and Personal Projects
A homemade cutting board makes the perfect gift. It’s personal, practical, and lasts for years.
Give it to someone getting married or moving to a new place. Give it to a foodie or someone who loves cooking. Give it to someone starting their first apartment.
Personalize it by picking their favorite wood type or colors. You can even carve their initials on the bottom if you’re feeling fancy.
Make one for your own kitchen too. You’ll use it every single day. Your friends and family will notice it and ask where you got it.
Final Thoughts on Making Your Own Cutting Board
Making a cutting board is a fantastic beginner woodworking project. It’s achievable, rewarding, and practical. You’ll end up with something beautiful that you can actually use and enjoy.
Start simple with a basic rectangular board in one wood type. Once you get comfortable, try stripes or different shapes. Add handles or fancy edges. The possibilities are endless.
Don’t worry about making it perfect. Homemade items are charming because they’re made with care and effort. Small imperfections add character.
Grab some wood, get your tools ready, and build yourself a cutting board. Your kitchen will thank you. You’ll feel amazing using something you made with your own hands.
The best part about making a cutting board is that you can use it immediately. Unlike some woodworking projects that just sit on a shelf, your cutting board goes to work right away. Every time you chop vegetables or slice bread, you’ll remember the satisfaction of building it yourself.
So what are you waiting for? Get your materials together and start building. Your homemade cutting board is waiting for you.

Mary is a home cooking enthusiast and kitchen gear reviewer with a passion for practical cookware and food preparation tools. She enjoys testing cutting boards, knives, kitchen gadgets, and other cooking essentials to help home chefs make smarter buying decisions. Through KitchenCutting.com, Mary shares honest product reviews, buying guides, and helpful kitchen tips to make cooking easier, safer, and more enjoyable.