How Do You Cut Fajita Meat?
If you have ever bitten into a fajita and felt like you were chewing on a rubber band, the problem is not the meat itself. It is how it was cut. Fajita meat needs a specific cutting method to turn out soft, juicy, and easy to eat. Once you learn this simple trick, your fajitas will taste like something from your favorite restaurant.
In this article
This guide will walk you through everything step by step. You will learn the tools you need, the exact technique to use, and the small mistakes that ruin good meat. By the end, you will know exactly how to cut fajita meat like someone who has been doing it for years.
Why Cutting Fajita Meat the Right Way Matters
Meat is made of long muscle fibers that run in one direction. Think of these fibers like little ropes bundled together. If you cut along the same direction as these ropes, each bite will feel tough and stringy. Your teeth have to work hard to break those long fibers apart.
But if you cut across those fibers, you shorten them. Shorter fibers mean less chewing and a much softer bite. This is the secret that most home cooks miss. Restaurants know this trick, and it is the main reason their fajitas taste so much better than what people make at home.
Good cutting also helps the meat cook evenly. Thin, even strips cook fast and stay juicy. Thick or uneven pieces can end up dry on the outside and raw in the middle.
What You Need Before You Start
Before you pick up a knife, gather a few basic tools. Having the right setup makes the whole process faster and safer.
- A sharp chef’s knife or a slicing knife
- A sturdy cutting board
- Paper towels for drying the meat
- A meat thermometer (optional but helpful)
- A resealable bag or container for marinating
A dull knife is actually more dangerous than a sharp one. It slips and requires more force, which raises the chance of an accident. So sharpen your knife before you begin, or ask someone at a local store to do it for you.
Best Cuts of Meat for Fajitas
Not every cut works the same way for fajitas. Some cuts are naturally more tender, and knowing which one to grab at the store will save you time and effort later.
Beef Options
Skirt steak and flank steak are the two classic choices for beef fajitas. Both cuts come from the belly area of the cow and have long, visible fibers running through them. This makes them perfect candidates for the against-the-grain technique.
Flap steak is another great pick. It has a bit more fat, which adds flavor, and it grills up nicely.
Chicken Options
For chicken fajitas, boneless chicken breast or chicken thighs work best. Thighs tend to stay juicier since they carry more fat, while breasts are leaner and cook a bit faster.
Other Proteins
Shrimp and pork can also be turned into fajitas. Shrimp does not need the same cutting method since it lacks long muscle fibers, but pork loin or pork shoulder still benefits from slicing against the grain.
How to Identify the Grain in Meat
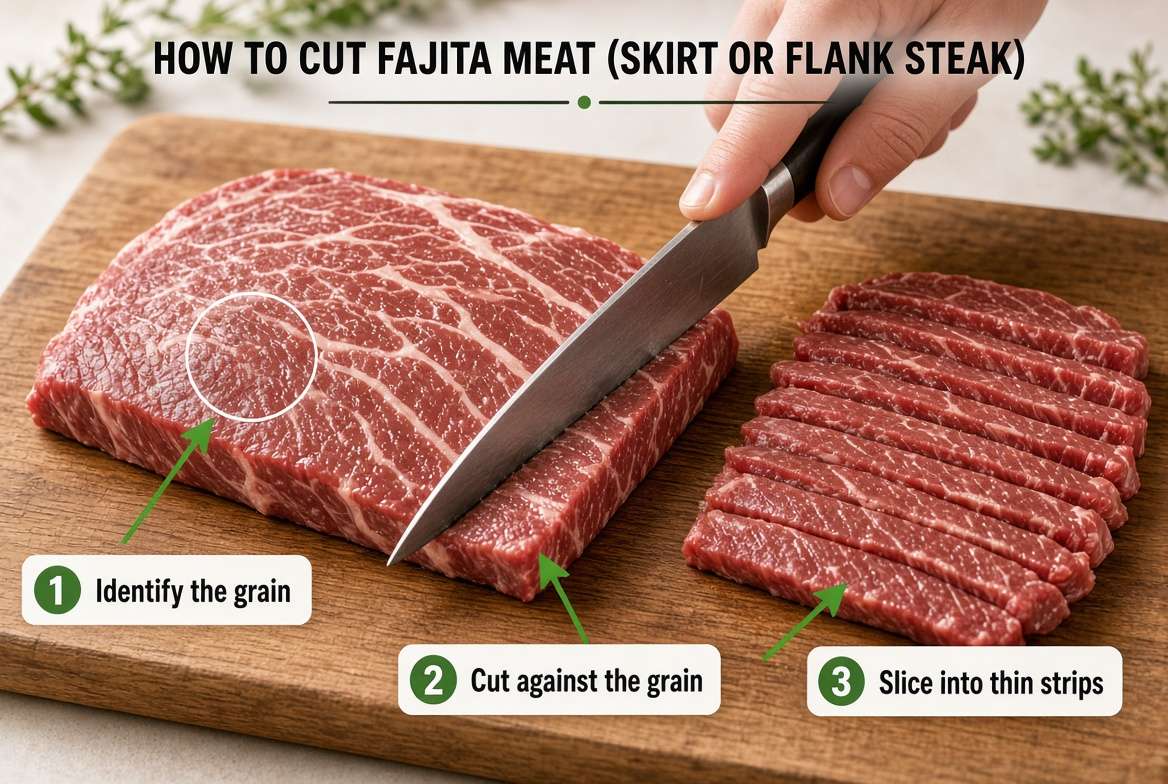
Before slicing, you need to spot the direction of the grain. Look closely at the surface of the raw meat. You will notice thin lines running across it, almost like the lines on a piece of wood. These lines show you the direction the muscle fibers travel.
Here is a simple way to check:
- Lay the meat flat on your cutting board.
- Look for parallel lines running along the surface.
- Trace those lines with your finger to confirm the direction.
- Plan to cut at a 90-degree angle to those lines.
Some cuts, like skirt steak, have grain that runs diagonally rather than straight. Take a moment to study the piece in front of you rather than assuming it matches a photo you saw online.
Step-by-Step: How to Cut Fajita Meat
Now let’s get into the actual process. Follow these steps in order for the best results.
Step 1: Chill the Meat Slightly
Pop the meat in the freezer for about 15 to 20 minutes before cutting. This firms it up just enough to make slicing easier and more precise. Do not freeze it solid, just enough that it feels firm to the touch.
Step 2: Pat the Meat Dry
Use paper towels to remove extra moisture from the surface. Wet meat is slippery and harder to control under the knife.
Step 3: Find the Grain Direction
As covered above, look for the lines running through the meat. Turn the piece so those lines run left to right on your cutting board.
Step 4: Slice Against the Grain
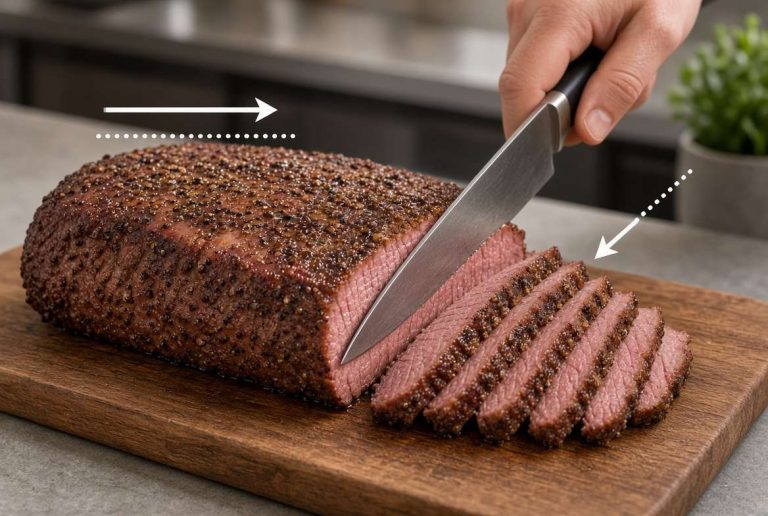
Hold your knife at a 90-degree angle to the grain lines. Cut in smooth, steady strokes rather than sawing back and forth. Aim for strips that are about a quarter inch thick. Thin strips cook fast and stay tender.
Step 5: Cut on a Slight Bias
For extra tenderness, angle your knife slightly, around 45 degrees, instead of cutting straight down. This is called cutting on the bias, and it exposes more surface area, which helps the meat soak up marinade and cook more evenly.
Step 6: Trim Excess Fat and Silver Skin
Look over each strip and remove any thick chunks of fat or the shiny white connective tissue known as silver skin. This tissue does not break down during cooking and can leave a chewy texture.
Step 7: Cut Into Even Lengths
Trim the strips into pieces around four to five inches long. This size is easy to eat and fits nicely into a tortilla.
Should You Cut Fajita Meat Before or After Cooking?
This is a question a lot of beginners ask, and the answer depends on what you’re making.
Cutting before cooking works best for stir-fry style fajitas cooked in a hot skillet. The thin strips cook quickly and soak up seasoning well.
Cutting after cooking is common when grilling whole steaks. You sear the entire piece of meat first, let it rest, then slice it against the grain right before serving. This method locks in more juice since the meat is not exposed and drying out in small pieces on the grill.
Both methods work. Pick whichever fits your cooking setup and the amount of time you have.
Marinating Tips That Pair With Good Cutting
Cutting the meat properly opens up more surface area, so your marinade needs to match that.
- Use an acidic ingredient like lime juice or vinegar to help tenderize further
- Add oil to help spices stick and keep the meat moist
- Let the meat sit in the marinade for at least 30 minutes, though a few hours gives even better flavor
- Avoid marinating too long with strong acids, since this can make the texture mushy instead of tender
A simple marinade of lime juice, garlic, cumin, chili powder, and oil covers most fajita recipes and brings out great flavor without much effort.
Common Mistakes to Avoid
Even with the right technique, small errors can still ruin your fajitas. Here are the ones to watch for.
Cutting With the Grain by Accident
This is the number one mistake. It happens when people rush or do not check the direction of the fibers first. Always pause and look before you start slicing.
Slicing Too Thick
Thick strips take longer to cook and often end up tough. Aim for thin, even pieces every time.
Using a Dull Knife
A dull blade tears the meat rather than slicing cleanly, and torn edges dry out faster during cooking.
Skipping the Rest Time After Cooking
If you cook a whole steak and slice it right away, the juices spill out onto the cutting board instead of staying inside the meat. Let it rest for five to ten minutes before cutting.
Cutting Meat That Is Too Warm
Room-temperature meat is soft and wobbly under the knife, which makes clean cuts harder. That short chill in the freezer really helps.
Tools That Make Cutting Easier
A few small upgrades can make this whole process smoother, especially if you cook fajitas often.
- Slicing knife: Longer and thinner than a chef’s knife, great for clean cuts through larger pieces
- Non-slip cutting board: Keeps the board steady so you can focus on the knife, not the board sliding
- Kitchen shears: Handy for trimming fat and silver skin without needing full knife strokes
- Meat thermometer: Confirms your protein is cooked to a safe internal temperature before you dig in
How to Store Cut Fajita Meat
If you’re prepping ahead of time, store the raw, cut strips in an airtight container or resealable bag in the fridge. Use it within a day or two for best freshness. For longer storage, place the strips in a freezer-safe bag, remove as much air as possible, and freeze for up to a few months. Thaw in the fridge overnight before cooking.
Quick Recap
Cutting fajita meat the right way comes down to one main idea: always slice against the grain. This shortens the muscle fibers and gives you soft, tender bites every time. Add a slight angle to your cuts, trim off excess fat, and keep your strips thin and even.
Pair your cutting technique with a good marinade and proper cooking time, and you will end up with fajitas that taste just as good, if not better, than the ones from your favorite restaurant.
Frequently Asked Questions
What is the best knife for cutting fajita meat?
A sharp chef’s knife or slicing knife works best. The blade length gives you smooth, long strokes instead of choppy cuts.
Can I cut fajita meat while it’s frozen?
It’s easier to cut meat that is partially frozen rather than fully frozen. A short 15 to 20 minute chill in the freezer gives you the firmness you need without making the meat too hard to slice.
Why is my fajita meat chewy even after cutting against the grain?
This can happen if the meat was overcooked, cut too thick, or if leftover silver skin was not trimmed away. Double-check your slice thickness and cooking time.
Is skirt steak or flank steak better for fajitas?
Both work great. Skirt steak has a bit more fat and flavor, while flank steak is leaner. It comes down to personal taste and what’s available at your store.
Do I need to marinate the meat after cutting it?
Yes, marinating after cutting helps the flavor soak in faster since the surface area is larger. Just avoid leaving it in an acidic marinade for too many hours.

Mary is a home cooking enthusiast and kitchen gear reviewer with a passion for practical cookware and food preparation tools. She enjoys testing cutting boards, knives, kitchen gadgets, and other cooking essentials to help home chefs make smarter buying decisions. Through KitchenCutting.com, Mary shares honest product reviews, buying guides, and helpful kitchen tips to make cooking easier, safer, and more enjoyable.