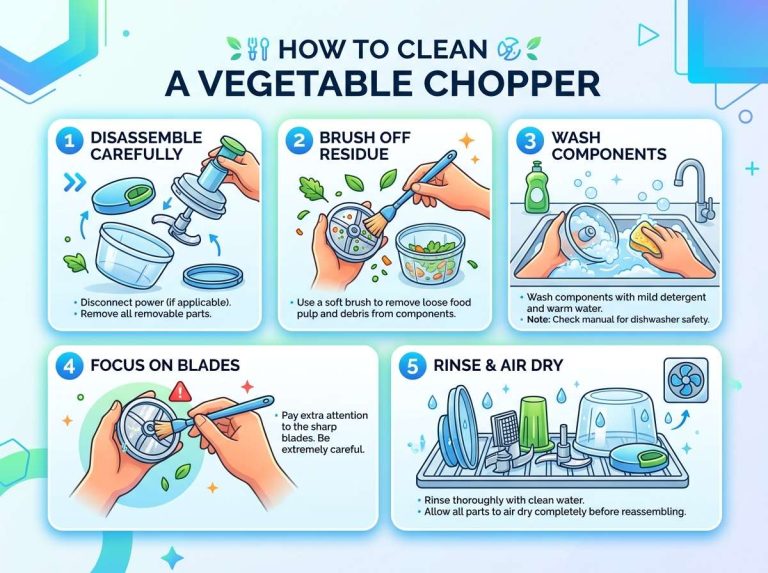
Vegetable Chopper Maintenance Guide
A vegetable chopper saves time in the kitchen, but it only keeps doing that job well when it is cared for. Good maintenance means cleaning it properly, keeping the blades in good condition, and storing it so parts stay safe and dry. This guide explains each step in plain words.
You will learn what the main parts do, which supplies you need, and how to clean and dry the chopper after each use. You will also see how to spot dull blades, care for electric models, avoid common mistakes, and fix a few typical problems. The guide ends with answers to frequently asked questions.
Key Takeaways
- Clean the chopper soon after each use, so food does not dry and stick to the parts.
- Handle blades with care, and wash them by hand unless the maker says the dishwasher is safe.
- Dry every part fully before you put the chopper away, to prevent rust and odor.
- Keep electric bases dry, and check cords and switches often.
- Store the chopper in one place, with blades covered and parts kept together.
What Is a Vegetable Chopper and Why Maintenance Matters
A vegetable chopper is a kitchen tool that cuts food into even pieces. Manual models use a hand-pressed plunger or lid. Electric models use a small motor to spin or pulse the blades. Both types have sharp parts and food contact surfaces that need regular attention.
Maintenance keeps the tool clean, sharp, dry and safe. Food left behind can harden, attract bacteria or cause odor. Dull blades make cutting harder and less even.
How a Vegetable Chopper Works
Most choppers have blades fixed inside a container, often above a grid. You place food in the container and press the lid or start the motor. The grid or blade setting controls how fine the cut is. Because the blades touch the food directly, they are the most important part to look after.
Common Parts Found in Manual and Electric Choppers
Most choppers share a few basic parts. The bowl holds the food, the blade assembly does the cutting, and the lid or pusher presses food onto the blades. Some models also include a grid and a rubber seal.
Electric choppers have a motor base and a power cord. The base should never be submerged in water. Manual choppers have no motor, so their care focuses on the blades, seals and plastic parts.
Why Regular Care Extends Blade and Motor Life
Clean blades stay sharper longer, because dried food and grit wear the cutting edge. Dry parts also resist rust on any metal that is not stainless steel. For electric models, a dry base protects the wiring and internal parts. A few minutes of care after each use prevents many common problems.
Tools and Supplies You Need for Basic Cleaning
You do not need special products to clean a vegetable chopper. A few everyday items are enough. Having them ready makes cleaning quicker and safer.
Safe Cleaning Tools and Soft Brushes
A soft brush or sponge works well for most parts. A small brush, such as an old toothbrush, helps clean grids, corners and small openings. Soft bristles protect plastic and keep blades from dulling.
Use a separate cloth or sponge for the blades. Work from the back of the blade toward the edge to avoid cuts while still removing food.
Mild Dish Soap, Warm Water and Drying Cloths
Warm water and a mild dish soap are usually all you need. Warm water loosens oily or starchy food, and gentle soap lifts residue without leaving a film. Rinse each part well so no soap stays on the surface.
A clean, dry cloth is useful for the final step. Drying each piece by hand helps prevent water spots and rust on metal parts.
What to Avoid Using on Blades and Plastic Parts
Avoid steel wool, abrasive scrubbers and harsh cleaners. These can scratch plastic and wear away the protective coating on metal blades. Bleach and strong chemicals can also weaken plastic over time.
Do not use knives or metal scrapers to pry food off blades. Soak the part briefly in warm soapy water, then brush it gently.
Step-by-Step Cleaning After Each Use
Cleaning soon after use is the easiest approach. Food that dries onto blades or grids is much harder to remove later. Following the same steps each time builds a simple habit.
Disassembling a Vegetable Chopper Safely
First, unplug an electric chopper and make sure the blades have stopped moving. Then take the chopper apart following the maker’s instructions. Handle the blade assembly by its base or plastic hub, not the cutting edge.
Keep small parts such as seals, lids and pushers together in one place so they do not get lost.
Washing Blades, Grids and Food Containers
Wash the container and lid in warm soapy water first. Next, clean the grid and blade assembly, brushing gently around each edge. Rinse every part under running water until no soap or food remains.
For the blades, wash from the back toward the cutting edge. Set the blade down with the edge facing away from you.
Drying Parts Completely to Prevent Rust and Odor
Wet parts can trap moisture in tight corners. Dry each piece fully with a clean cloth, then let it air dry briefly before storing. Pay special attention to hinges, seals and the spaces under the blade assembly.
Moisture left inside a closed chopper can lead to odor and mildew. Store it only when every part is completely dry.
Using the Dishwasher: Yes or No
Some choppers list parts as dishwasher safe, but many blades and seals are better washed by hand. Heat and strong detergent can dull blades, cloud plastic and wear down rubber seals. Always check the maker’s instructions first.
If the dishwasher is allowed, place sharp parts in a basket where they will not move around. Hand washing is usually gentler on the blades.
Keeping the Blades Sharp and Safe
Sharp blades cut cleanly and need less pressure. Dull blades can crush vegetables and make the chopper harder to use. Good care helps blades stay effective longer.
Signs That Blades Are Dull
A common sign is uneven cutting, with some pieces large and others mashed. Vegetables may stick to the blades or seem to tear rather than slice.
Visible nicks, bends or rust spots mean the blades need a closer look. Any damage to the cutting edge needs attention.
Simple Blade Care and Storage Habits
Clean blades soon after each use and dry them fully. Avoid cutting hard or frozen foods, which can chip the edge. Store blades separately so they do not knock against other metal items.
A blade guard or cover protects the edge in storage. Keep it on whenever the blade is not in use.
When to Replace Blades Instead of Sharpening
Some blades can be sharpened, but many household choppers use blades not designed for it. Deep chips, bends or rust that cannot be cleaned off usually mean replacement is the safer option. Check if the maker sells replacement blades for your model.
Never try to bend a damaged blade back into shape. A weak or misaligned blade can break during use and create a safety risk.
Caring for Electric Vegetable Choppers
Electric models combine food contact parts with a motor and wiring, so they need extra attention. Simple habits keep the motor and power base working safely.
Keeping the Motor and Power Base Dry
Never immerse the power base in water or let liquid enter the motor housing. Wipe the base with a slightly damp cloth, then dry it fully. Clean spills promptly, since dried food can build up around buttons and vents.
Checking Cords, Plugs and Safety Switches
Check the power cord and plug regularly for cracks, fraying or loose connections. Do not use a chopper with a damaged cord. Make sure the safety switch or lid lock engages properly before use.
If the chopper will not run with the lid closed, the lock may be dirty or misaligned. Clean the contact points gently and check that the lid sits flat.
Preventing Overheating During Long Use
Electric motors can get warm during long or heavy use. Give the chopper short breaks when processing large batches, and do not run it longer than the maker’s instructions allow.
Avoid overloading the bowl, since a strained motor heats up faster. Cut food into smaller pieces when possible.
Storage Tips to Protect Your Chopper
Good storage keeps parts clean, dry and safe. It also prevents loss and damage between uses.
Storing Blades Safely and Out of Reach
Store blades in a dry drawer or on a high shelf, out of children’s reach. Keep the blade cover on whenever possible to reduce the risk of cuts.
Keeping Parts Together So Nothing Gets Lost
Keep all parts in one container or area, and store lids, seals and pushers with their bowl. Before each use, check that every part is present, since missing seals or lids can stop the chopper from working correctly.
Common Maintenance Mistakes Beginners Make
Most maintenance problems come from a few common habits. Knowing them makes them easier to avoid.
Putting Sharp Blades in Hot Water or Soaking Them
Long soaks can cause rust, especially on carbon steel, and hot water with strong detergent can dull the edge. Rinse and wash blades promptly, then dry them completely. Keep the blade assembly out of long soaks.
Ignoring Stuck Food in Grids and Hinges
Food trapped in grids and hinges can harden and cause odor. Use a small brush to clear these areas after every use.
Overloading the Chopper or Forcing Vegetables Through
Too much food at once can jam the blades and strain the motor. Work in small batches and let the blades do the cutting. If food jams, stop, unplug the unit and clear it before trying again, since forcing food can bend parts and create a safety risk.
Troubleshooting Common Problems
Most common problems have simple causes. Checking the basics often solves them without special tools.
Chopper Won’t Start or Motor Stops Mid-Task
Check that the plug is firmly in the outlet, the power switch is on and the lid is closed and locked, since many electric choppers will not run otherwise. If the motor stops during use, unplug the unit, check for jams and let the motor cool. If the problem continues, follow the maker’s guidance or contact customer support.
Uneven Cuts and Vegetables Sticking to Blades
Uneven cuts often point to dull blades, overfilled bowls or food that is too soft or too hard. Cut food into smaller, uniform pieces and clean residue from the blades. A light coating of oil on the blade edge can help, but wipe off the excess before use.
Strange Smells or Discolored Plastic
Odors usually come from food trapped in seals or corners. Wash those areas with warm soapy water and dry them completely. Avoid bleach, since it can weaken plastic and leave a smell.
Frequently Asked Questions
How often should I clean a vegetable chopper?
Clean the chopper after every use. Food left on the blades and seals can dry and harden, which makes it harder to remove later.
Can I put every part of a vegetable chopper in the dishwasher?
Not always. Some parts may be dishwasher safe, but blades and rubber seals are often better washed by hand. Check the maker’s instructions first.
How do I know when a chopper blade needs sharpening?
Look for uneven cuts, food sticking to the blade, or more force needed to push food through. Visible nicks or bends also mean the blade needs attention. A damaged blade is often safer to replace than to sharpen.
How do I remove a bad smell from my chopper?
Wash all parts with warm soapy water, paying close attention to seals and corners. Soak plastic parts briefly in warm water with a little baking soda, then rinse and dry fully before storing.
Is it safe to clean a chopper while it is plugged in?
No. Unplug electric choppers and make sure the blades have stopped moving before cleaning. Never place the motor base under water, and handle blades carefully to avoid cuts.
Conclusion
Good chopper maintenance comes down to a few steady habits. Clean and dry the parts after each use, handle blades with care, and keep electric bases away from water.
With these steps, a chopper stays clean, safe and effective for longer. Regular attention prevents most common problems.

Mary is a home cooking enthusiast and kitchen gear reviewer with a passion for practical cookware and food preparation tools. She enjoys testing cutting boards, knives, kitchen gadgets, and other cooking essentials to help home chefs make smarter buying decisions. Through KitchenCutting.com, Mary shares honest product reviews, buying guides, and helpful kitchen tips to make cooking easier, safer, and more enjoyable.