5 Best Grits For Sharpening Knives In 2026
As an Amazon Associate we earn from qualifying purchases.
Many people wonder which grits for sharpening knives will give them the best results without a steep learning curve. This guide helps beginners who have never sharpened a blade before, as well as home cooks who want to understand what they are buying.
Grit is simply a measure of how coarse or fine the abrasive surface on a stone is. Lower numbers cut faster and leave a rougher surface, while higher numbers cut slowly and leave a smoother, more refined edge.
The five products covered here are all water-use whetstone kits sold for home knife care. Most of them share a similar design: two grit levels on a stone, a non-slip base and a flattening tool. This comparison rests on the listed features and typical use of each kit, not on personal testing. Where a detail is not stated in the product listing, this guide does not assume it.


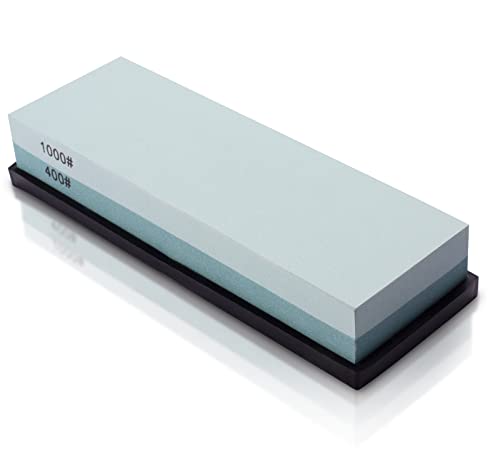


1. Intelitopia Complete Knife Sharpening Stone Set: best for a full starter kit
What this kit includes
This set is built as a complete starter package. It pairs a dual-sided whetstone with 400/1000 and 3000/8000 grit faces, a coarse flattening stone, a bamboo base, an angle guide, a leather strop and a simple instruction manual. Buyers who want everything in one box will find that appealing. Because each piece is included, there is no need to shop separately for a base or a strop.
Grit explained in plain words
The lower number, 400, is coarse and removes metal quickly, which suits dull or chipped blades. The higher number, 8000, is very fine and leaves a polished edge. A common approach is to start on the coarse side for repair, then move up through the finer side to refine the edge. The stone is made of corundum, also called aluminum oxide, a hard abrasive used widely in sharpening.
Real-life use
Daily use usually involves soaking the stone until bubbles stop rising, placing it on the bamboo base and working the blade at a steady angle. The flattening stone is useful because whetstones wear unevenly over time, leaving hollows that make consistent angles harder to hold.
The strop helps remove the tiny burr left after sharpening, which is a thin curl of metal along the edge. Many users run the blade lightly across the strop as a final step.
Versatility
The listing says the stone suits many blade types, including kitchen knives, Japanese knives, pocket knives, scissors and straight razors. That range makes it a practical choice for a household with mixed tools. Each blade type has its own ideal angle, so checking the blade’s recommended edge angle before sharpening is a sensible habit.
Performance and ease of use
Because the kit covers coarse to fine grits in one package, a beginner can handle both restoring an edge and finishing it. The angle guide reduces guesswork, although good technique still takes practice. Keeping the stroke even and the pressure light tends to matter more than speed. The manual helps explain what each piece does and how the stages fit together.
Value for money
At the listed price, the kit includes several accessories that would otherwise be bought separately, such as a flattening stone, a base and a strop. Buyers who only need a basic stone may find the extra pieces more than they use. Comparing the included items against your own needs will show if the bundle is a good fit.
Pros
- Complete kit with flattening stone, strop, angle guide and base
- Dual grit covers both repair and polishing stages
- Suitable for many blade types, including scissors and razors
- Includes a basic instruction manual for beginners
Cons
- Many accessories may be more than a casual user needs
- Beginners still need practice to hold a steady angle
- Stone sits on a bamboo base that requires care to keep it dry
2. HMPLL Knife Sharpening Stone Set: best for a budget-friendly four-side option
Four grit faces in one set
This set includes two stones with 400/1000 and 3000/8000 grit, giving four usable faces. The listing describes the 400 grit side for chipped or very dull blades. The finer side refines the edge and adds a polished finish.
Coarse grit removes metal quickly, so it suits repairs. Fine grit smooths the edge and makes it sharper for everyday cutting. Many beginners start on the 1000 side and move to the 3000 or 8000 side once they are comfortable with the process.
Material and durability
The stone is made of white corundum, which the listing describes as heat and corrosion resistant. Stones of this type tend to wear down over time, so the listed durability is a helpful point for regular users.
Wear is normal for any whetstone. As the stone is used, the surface can become uneven, and flattening it with a flattening stone or coarse sandpaper on a flat surface helps keep sharpening consistent.
Safety features
The kit includes a bamboo base, a silicone holder and a rubber support on the underside. These parts aim to keep the stone still during use. A stable stone reduces the stone shifting under pressure, which is one of the main safety concerns for beginners.
Placing a damp towel or a non-slip mat under the base can add extra grip on smooth counters. Keeping fingers behind the edge and moving the blade away from the body also lowers the risk of cuts.
Water-only sharpening
Like most whetstones, this set uses water rather than oil. The listing says the stones should soak for about 10 to 15 minutes before use. Adding water during sharpening helps the process run more smoothly.
Water-based stones need a fresh splash now and then, because the slurry that forms on the surface does the cutting. Rinsing the stone and the knife after each session keeps the surface clean and ready for the next use.
Range of blades
The product is described as suitable for carbon steel and stainless steel knives, scissors, razors, shears and even chisels and axes. That makes it a flexible choice for a household with many cutting tools.
Harder steels take longer to sharpen on any stone, and very thick tools such as axes need more time on the coarse side. Using the stone for a variety of tools is practical, but it is still worth checking that each tool suits the grit being used.
Ease of use and value
The setup is simple: soak, place, and sharpen with a steady hand. The set does not include as many extras as some larger kits, which keeps the price lower. Buyers who want a basic, affordable set may find it a sensible fit.
Holding a consistent angle is the skill that takes practice. Marking the edge with a marker and checking where the ink wears away can show if the angle is steady. Regular short sessions often teach more than one long session.
Pros
- Four grit faces across two stones
- Includes a non-slip base and silicone holder for stability
- Works with a wide range of cutting tools
- Water-only use avoids the cost of honing oil
Cons
- Fewer accessories than fuller kits, such as no strop listed in the title
- Beginners will still need to learn a consistent angle by feel
- Soaking time must be planned before each session
3. MIDO PROFESSIONAL ABRASIVE Knife Sharpening Stone: best for a simple two-grit stone
A focused, simple design
This product is a single stone with a 400 grit side and a 1000 grit side. It is a more basic option than the full kits. Its simplicity is the main appeal for someone who wants a single tool to learn on.
With only one stone to manage, there are fewer choices to make during a session. Beginners can focus on technique, such as angle and pressure, before adding more grits to their routine.
Silicon carbide material
The stone is made of green silicon carbide, a hard abrasive that the listing describes as corrosion and heat resistant. The 400 side is for reshaping edges, while the 1000 side smooths and polishes them.
Silicon carbide cuts quickly and can be harder on the stone’s surface than some other abrasives. Working on the coarse side only when needed helps the stone last longer and keeps the edge from becoming overly rough.
Base and assembly
The stone fits into a silicone holder that sits on an acacia wood base with a non-slip surface. The listing says assembly is quick and that the stone should not slip during use. Buyers who value a tidy, minimal setup may appreciate this.
Acacia is a hardwood, and wood bases can swell if they stay wet. Drying the base after each session and keeping it away from standing water helps it stay in good condition.
Water use and cost
Like other whetstones here, it uses water instead of oil. The listing suggests soaking for 5 to 10 minutes before use. The lower price makes it one of the more budget-friendly options in this group.
A shorter soak time can make it easier to start a quick touch-up. Checking that the stone has stopped releasing bubbles is a simple way to know it is ready, as most stones are soaked until bubbling slows.
Performance and limits
Because it has only two grits and no polishing or finishing accessories, it covers the basics well. Those who want a fine mirror-like finish may need a finer stone or a strop added later.
For kitchen knives used mainly for everyday tasks, a 1000 grit finish is often enough. Specialty tools or very fine edges usually call for finer stones, so it helps to match the stone to the tools you use most.
Pros
- Simple two-grit design that is easy to learn on
- Non-slip acacia base with a silicone holder
- Low price compared with fuller kits
- Water-only use with a short soak time
Cons
- No finer grit beyond 1000, so the finish is less refined
- No angle guide or strop included
- Fewer accessories may mean buying extras later
4. Sharp Pebble Complete Whetstone Knife Sharpening Kit: best for beginners who want angle control
Built-in angle guides
This kit includes adjustable angle guides set at 15, 17, 20 and 22 degrees. The angle is the tilt of the blade against the stone. Holding a steady angle is one of the hardest skills for beginners, so these guides aim to make it easier.
Dense 1000 and 6000 grit stones
The 1000 grit side handles dull blades, while the 6000 grit side refines the edge. The listing describes the abrasive as dense and even, which it says helps spread pressure across the blade. That can reduce uneven spots on the edge.
Daily Daily use and handling
In daily use, the stone sits on a non-slip base and stays put once it is set up. Water is the only lubricant needed, so there is no oil to clean up afterward. Many beginners find this simpler than messy honing oils.
The angle guides are built into the kit, so the blade rests against them during each pass. Because the guides hold the angle, the sharpener does not need to rely only on feel. This makes it easier to keep the edge even from heel to tip.
Performance and ease of use
The 1000 grit side removes metal at a moderate pace, which suits blades that have dulled over time. The 6000 grit side then smooths the edge for a cleaner cut. Together, the two sides cover the main stages that most home users need.
Because the angle is guided, beginners can focus on pressure and stroke length. Sharpening still takes patience, and results depend on the blade’s starting condition. Even so, the guided approach lowers the learning curve compared with freehand work.
Value for money
This is the most expensive kit in this group at the listed price. Buyers pay more for the angle guides and the finer 6000 grit side. For someone who wants guided sharpening from the start, that added cost may feel worthwhile.
Pros
- Built-in angle guides help beginners hold a steady angle
- Dual grit covers both dull edges and fine polishing
- Non-slip base keeps the stone stable during use
- Water-only use avoids honing oil and keeps cleanup simple
Cons
- Higher price than the other sets in this comparison
- Fixed angle options may not suit every blade type
- No strop or flattening stone is listed in the kit
5. ELEAD 12-Piece Knife Sharpening Stone Set: best for a large all-in-one kit
A large set with many extras
This set includes four stone faces across 400/1000 and 3000/8000 grit, plus many accessories. These include a bamboo base, a rubber base, a leather strop, a flattening stone, a polishing compound, an angle guide, a metal honing guide and cut-resistant gloves. It is the most fully equipped set in this group.
The large number of parts can feel overwhelming at first. Each piece has a clear role, though, which helps a buyer build a complete routine over time. A useful way to approach the kit is to learn one stage at a time, starting with the coarse stone and moving toward the finer faces.
Honing guide and polishing compound
The metal honing guide clamps onto the blade and holds it at a set angle. Keeping the angle steady is one of the hardest skills for beginners, so this tool can make early results more predictable. The polishing compound works with the leather strop to refine the edge further. These tools add control, especially for someone who wants a sharp finish.
Safety and setup
The bamboo base and rubber base aim to keep the stones secure during sharpening. A stone that slides across the counter is both messy and risky, so a stable base matters. The cut-resistant gloves add a layer of hand protection, which many beginners may value. The flattening stone helps keep the whetstone surface level, which supports even contact with the blade over time.
Use cases
The listing describes use on kitchen knives, hunting knives, pocket knives, scissors and chisels. Hobbyists and home cooks with many tools may find the range useful. The kit suits people who want to handle most sharpening tasks in one place. Anyone who only owns one or two kitchen knives may use only a small part of the set.
Ease of use and value
Setup takes a bit more time because of the number of parts. Once the routine is learned, the included tools can make sharpening more consistent. At the listed price, the set offers many accessories, which may suit buyers who would otherwise buy them one by one. Comparing the total cost of the separate items with the price of the set is a practical way to judge value.
Pros
- Large kit with four grit faces and many accessories
- Metal honing guide and angle guide support steady sharpening
- Includes cut-resistant gloves and a cleaning towel
- Works with many blade types, from kitchen knives to chisels
Cons
- Many parts can take time to learn and set up
- Extra accessories may go unused by casual users
- Honing guide and angle guide need practice to use well
Comparison insights: how the five sets differ
All five products use water and offer some form of grit range. The main differences lie in how many accessories come in the box and how much guidance each one gives. Those two factors shape performance, ease of use and value.
On performance, the sets with a finer 6000 or 8000 grit face can produce a smoother finish. The 400/1000 pairing on its own covers repair and basic polishing. Because of this, buyers who want a mirror-like edge should look at the higher-grit options. A coarse stone alone will leave a more visible scratch pattern, even when used carefully.
On ease of use, the Sharp Pebble kit stands out because of its built-in angle guides. The ELEAD set adds a metal honing guide, which also helps with angle control. The guide clamps the blade at a set position, so the same angle repeats across each pass. The MIDO stone is the simplest to learn on, but it offers less help with technique, so new users will need to practice holding the angle by hand.
On value, the HMPLL and MIDO products sit at the lower end of the price range. The Intelitopia and ELEAD kits include the most accessories for the money. The Sharp Pebble kit costs more, so its price is best justified by the angle guidance it provides. If you already own a honing guide or strop, a simpler stone may offer better value.
Buying guide: key factors explained in plain words
Grit is the first thing to understand. A low number such as 400 is coarse and removes metal quickly. A high number such as 6000 or 8000 is fine and polishes the edge. Most people start with a medium grit and move up to finer grit as the edge improves.
Most beginners do well with a dual-grit stone, because it covers both repair and finishing. A stone with a coarse side and a fine side lets one tool handle the full process. This saves you from buying separate stones for each step.
Water-use stones are common and affordable. They need soaking before use, but they avoid the mess of honing oil. Check how long the listing says to soak the stone, and plan for it. A stone that is not fully soaked can release air bubbles and wear unevenly, so give it the full recommended time.
A non-slip base matters for safety. A stone that slides during sharpening can cause accidents, so look for a base with rubber feet or a silicone holder. A damp towel placed under the stone can also help keep it still on a counter.
Angle guides help beginners hold a steady angle. This angle is the tilt of the blade against the stone. Built-in or clamp-on guides can reduce uneven edges. Many knife edges work well at a common angle, but the right number depends on the blade and its intended use, so check the manufacturer’s guidance.
Accessories such as a strop, flattening stone and honing guide are helpful but not essential. A strop helps remove the burr, which is a thin rim of metal left after sharpening. A flattening stone keeps the whetstone surface even over time, since the stone wears unevenly with use. Add these only when you notice a need for them.
Finally, consider how many blades you need to sharpen. A stone that suits kitchen knives may not suit chisels or axes, and the listings vary on this point. Confirm the intended use before you buy, so the stone matches the tools you own.
Who should buy these products: matching buyers to the right set
A first-time buyer who wants everything in one box may look at the Intelitopia kit. Its flattening stone, strop and angle guide cover the main needs. It suits someone who would rather not shop for each part separately.
Having all the parts in one package also means the beginner does not have to guess which accessories work together. The flattening stone helps keep the sharpening surface even over time, which many beginners overlook at first. Everything arrives ready to use on the same workbench.
A budget-minded buyer with a few kitchen knives may find the HMPLL set a sensible starting point. Its four grit faces and stable base cover the basics at a lower price. It suits someone who wants to learn without spending much.
Four grit faces give a buyer room to grow. A user can start on a coarser face for a dull kitchen knife, then move up to finer faces for a polished edge. This range matters most for someone who sharpens several everyday blades.
A person who wants a simple, single stone to learn on may prefer the MIDO product. Its two grits and non-slip base keep the setup easy to manage. It suits someone who plans to add tools later.
A single stone means fewer parts to store and fewer choices to make during early practice. Learners can focus on holding a steady angle and building a consistent motion. Later, they can add a strop, guide or extra stones as their needs change.
A beginner who struggles with angle control may benefit most from the Sharp Pebble kit. Its built-in guides and finer 6000 grit face support a guided routine. It suits someone who values control over a lower price.
Angle control is one of the hardest skills for new sharpeners to learn. A guide helps hold the blade at a more consistent angle, which often leads to a more even edge. The finer face also lets the user refine the edge after the main work is done.
A hobbyist or home cook who wants a full workshop set may consider the ELEAD kit. Its honing guide, polishing compound and gloves offer many options in one package. It suits someone who expects to sharpen many different tools.
A wider range of tools makes sense when the buyer plans to sharpen more than kitchen knives. The polishing compound can help with edges that need extra finishing. The gloves add a layer of hand protection during longer sessions.
Final verdict on the best grits for sharpening knives
No single set is the right choice for everyone. The best fit depends on budget, the number of tools and how much technique help a buyer wants. Each product here has a clear role.
Think about the blades you use most often before you buy. A buyer with only a few kitchen knives needs a different setup than someone who sharpens garden tools, scissors and chisels. Matching the set to your real workload avoids paying for tools you will never use.
For a complete starter kit, the Intelitopia set offers the most accessories. For a lower price with four grit faces, the HMPLL set is a practical option. For guided angle control, the Sharp Pebble kit is the most focused choice.
In short, match the grit range and the included tools to the blades you own. Beginners should prioritize a dual-grit stone, a non-slip base and some form of angle help. With those basics, sharpening becomes a routine you can build on over time.
Frequently Asked Questions
What does grit mean when sharpening knives?
Grit describes how coarse or fine the abrasive surface on a stone is. A lower number, such as 400, is coarse and removes metal faster. A higher number, such as 3000 or 8000, is fine and gives a smoother, polished edge.
Coarse grits are usually used for repairing a dull or chipped edge. Fine grits are used afterward to refine the edge and improve how it cuts. Many sharpeners move through several grits in order, from coarse to fine.
Which grit should a beginner start with?
Most beginners start with a dual-grit stone that has a coarse side and a fine side. The coarse side handles dull or chipped edges, while the fine side refines and polishes. This covers the main stages of sharpening with one tool.
A beginner can practice on an older knife before working on a favorite blade. This lets them learn the motion and angle without risking an expensive edge. Patience matters more than speed during the first few sessions.
Do whetstones need oil?
Most of the sets in this guide use water instead of oil. Water-use stones are usually soaked before use and kept wet during sharpening. This avoids the cost and mess of honing oil.
Soaking times vary by stone, so the product instructions should be followed closely. A stone that runs dry during use can wear unevenly and may not cut as well. Keeping a small tray or towel nearby helps manage water spills.
Why is a non-slip base important?
A non-slip base keeps the stone still while you work. A stone that moves can make it harder to hold a steady angle and may increase the risk of injury. Bases with rubber feet or silicone holders help keep the stone in place.
Placing a damp towel under the stone is a simple extra step if the base does not grip well. Work on a flat, stable surface at a comfortable height. Good posture makes it easier to keep the blade under control.
What is a strop used for?
A strop is a leather tool that helps remove the burr, a thin rim of metal left on the edge after sharpening. Many people use a strop as a final step to smooth the edge. It is useful, though not required for every sharpening routine.
Strops are often used with a light compound to help polish the edge. Drawing the blade away from the edge, rather than into it, helps protect the cutting surface. Many beginners find that a strop makes a noticeable difference on kitchen knives.

Mary is a home cooking enthusiast and kitchen gear reviewer with a passion for practical cookware and food preparation tools. She enjoys testing cutting boards, knives, kitchen gadgets, and other cooking essentials to help home chefs make smarter buying decisions. Through KitchenCutting.com, Mary shares honest product reviews, buying guides, and helpful kitchen tips to make cooking easier, safer, and more enjoyable.