How To Remove Odors From Cutting Boards
Cutting boards are handy, but they can hold onto strong smells long after dinner is over. Garlic, onion, fish and spices can all leave a lingering scent behind. Learning how to remove odors from cutting boards is a simple skill that anyone can practice in a few minutes.
This guide explains why boards hold smells, which household items work best, and how to follow easy cleaning steps. It also covers the differences between wood and plastic boards, common beginner mistakes and ways to stop odors from building up. By the end, you will have a clear plan you can use at home.
Key Takeaways
- Odors sink into the surface of a cutting board, so surface washing alone often is not enough.
- Baking soda, vinegar and lemon are common household options that can lift smells.
- Wooden boards need gentle care and should never be left soaking in water.
- Washing right after use and drying fully are the best ways to prevent odors.
Why Cutting Boards Hold Onto Odors
Cutting boards are made to be cut on, which means they have tiny grooves and scratches. Food particles and oils slip into these openings. Over time, they can cause a smell that stays put.
How Wood and Plastic Absorb Smells
Wood is naturally porous, so it soaks up liquids and oils. Those oils carry scent deep into the grain. Plastic is less porous, but deep knife marks can still trap bits of food.
Because of this, a plastic board may smell less than wood at first. Even so, both materials can keep odors if they are not cleaned well.
Common Sources of Strong Smells
Some foods are known for strong, sticky smells. Garlic, onion, fish, raw meat and pungent spices are common examples. Their oils spread easily across the board.
Cutting strong foods and then using the same board for fruit or bread can pass on those smells. Wiping the board only once may leave residue behind.
Basic Tools You Need Before You Start
You do not need special products to clean a cutting board. Most people already have what they need in the kitchen. Gather a few simple items before you begin.
Baking Soda, Vinegar, and Lemon
Baking soda is a mild powder that helps lift odors and loosen grime. White vinegar is an acid that can cut through oily residue. Lemon juice or lemon halves offer a fresh citrus scent and a mild acid.
These items are gentle options for everyday use. They work best on light to moderate smells.
Coarse Salt and Dish Soap
Coarse salt, such as kosher or sea salt, acts as a gentle scrubbing grit. It helps lift bits of food from the surface. Mild dish soap removes grease that can hold smells.
Use only a small amount of soap and rinse it off well. Leftover soap can affect the taste of food.
Cleaning Brushes and Scrapers
A stiff brush helps work paste or salt into the grooves. A bench scraper or dough scraper can lift stuck-on food. Choose tools that will not scratch the board.
A soft sponge works well for rinsing and wiping. Keep separate tools for the board if you prefer.
Step-by-Step Methods to Remove Odors
Each method below uses simple household items. Start with the one that fits your board and the strength of the smell. You can also combine steps when needed.
Baking Soda Paste Method
Mix a little baking soda with a small amount of water until it forms a thick paste. Spread the paste over the board, especially in the grooves and stained spots.
Let it sit for several minutes. Then scrub gently with a brush or sponge. Rinse with cl ean water and dry the board well.
Vinegar Wipe Method
Dampen a cloth with white vinegar. Wipe the entire surface, paying extra attention to the knife marks. The acid helps break down oily residue that holds odors.
Wipe again with a clean damp cloth to remove the vinegar. The sharp smell fades quickly as the board dries.
Lemon and Salt Scrub Method
Cut a lemon in half. Sprinkle coarse salt over the cut board area, then rub the lemon half across the surface. The salt provides gentle grit, while the lemon juice adds a fresh scent.
Let the mixture sit briefly, then rinse the board with clean water. Pat it dry with a towel.
Drying and Airing Out the Board
Drying matters as much as cleaning. Damp boards can hold on to smells and may encourage bacteria to grow. Stand the board on its edge so air can reach both sides.
Place it in a spot with good airflow. Let it dry completely before storing it.
Tips for Wood Versus Plastic Cutting Boards
Wood and plastic boards need different care. Knowing the difference helps you avoid damage. It also keeps the board working well for longer.
Caring for Wooden Boards Without Soaking Them
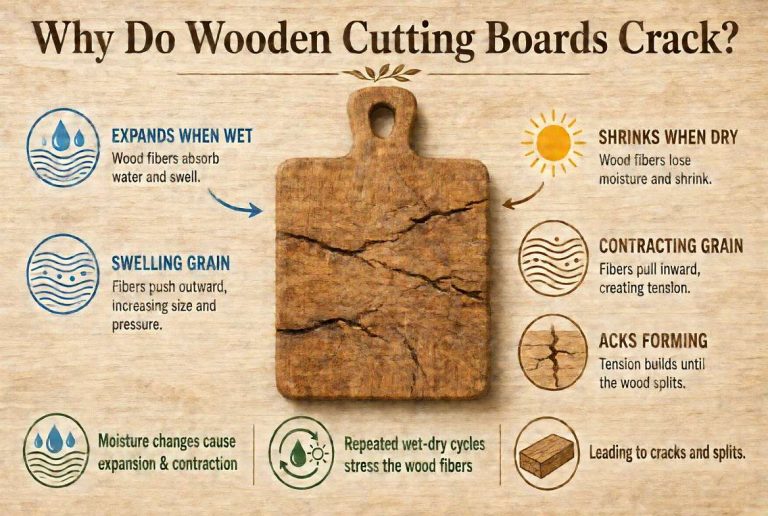
Wood should never sit in water. Soaking can cause warping and cracks. Clean wood with a damp cloth and dry it right away.
Some people use food-safe mineral oil now and then to help keep wood from drying out. Oil is not a cure for odors, but it can help the surface stay in good shape.
Cleaning Plastic Boards Safely
Plastic boards handle hot water and dish soap well. You can wash them in the sink with warm, soapy water. Rinse thoroughly.
Check if the manufacturer says the board is dishwasher-safe. If the label is unclear, hand washing is the safer choice.
Preventing Odors Before They Start
Prevention saves time later. A few habits can keep smells from building up. Small steps during everyday cooking make a clear difference.
Washing Boards Right After Use
Rinse and wash the board soon after you cut strong foods. Food residue dries and becomes harder to remove. A quick wash keeps oils from settling into the surface.
Keeping Strong-Smelling Foods Separate
Consider using one board for strong foods and another for fruit, vegetables and bread. This simple habit limits how far odors can travel. Labeling boards by color or type can help everyone in the kitchen remember.
Storing Boards So They Dry Fully
Store boards only after they are completely dry. Trapped moisture can cause smells to return. Upright storage in a rack lets air move around the board.
Common Mistakes Beginners Make
Many beginners make small errors that lead to bigger problems. Knowing these mistakes helps you avoid them. Each one is easy to correct.
Soaking Wood in Water
It can seem like soaking will pull out odors, but water can warp and crack wood. It may also leave the grain swollen. Use a damp cloth instead.
Using Harsh Chemicals on Food Surfaces
Strong cleaners can leave residue that is hard to rinse away. Bleach and similar products are not suited for daily food surfaces unless the label says so and the board is rinsed very thoroughly. Stick with gentle household items when possible.
Comparing Natural Cleaning Options
Each natural option works best in different situations. Knowing when to use each one helps you get better results. The table below offers a quick guide.
| Option | Best For | Key Note |
|---|---|---|
| Baking soda | Light to moderate odors and grime | Works well as a paste with gentle scrubbing |
| Oily residue and everyday wipe-downs | Rinse off with clean water so the sharp smell fades | |
| Lemon and salt | Fresh scent and light scrubbing | Good for a quick refresh rather than deep stains |
When Baking Soda Works Best
Baking soda suits boards with mild to moderate smells. It also works well on light staining. The paste form gives it enough contact time to lift odors from the grooves.
Because it is gentle, it is a good first choice for most boards. Rinse well afterward so no powder remains.
When Vinegar or Citrus Works Best
Vinegar helps when a board feels greasy or sticky. Its acid can cut through oily films that trap smells. Citrus works in a similar way, with a fresher scent that many people find pleasant.
Both options are best used as quick wipes. Always rinse and dry the board after using them.
When a Deeper Clean Is Needed
Some boards keep a smell even after regular cleaning. Deep grooves or old stains may need more time. Repeat the baking soda paste method and let it sit a bit longer.
If the smell remains after several careful attempts, the board may have deep damage. In that case, a light sanding of wood or replacement may be the next step.
Frequently Asked Questions
Can I put a cutting board in the dishwasher to remove odors?
Some plastic boards are labeled dishwasher-safe, but wood should never go in the dishwasher. The heat and water can warp or crack wood. Check the manufacturer’s label before using a dishwasher with any board.
Why does my cutting board still smell after cleaning?
Odors can sink deep into knife marks and grain, so surface cleaning may not reach them. The board may also still be damp, which can keep smells lingering. Try a baking soda paste, let it sit longer, and dry the board fully.
Is it safe to use vinegar on a wooden cutting board?
White vinegar is generally used as a light cleaning option on wood, and a quick wipe is common. Use only a small amount on a damp cloth and rinse afterward. Avoid letting vinegar soak into the wood for long periods.
How often should I clean my cutting board to avoid odors?
Wash the board after each use, especially after cutting strong foods. A deeper clean with baking soda or salt can be done every week or so if the board sees heavy use. Adjust the schedule based on how often you cook and what you prepare.
When should I replace a cutting board because of smell?
Consider replacing a board if the smell stays after several thorough cleanings. Deep cracks, warping or soft, fuzzy areas can also hold odors and bacteria. A new board may be a simpler solution than repeated cleaning.
Conclusion
Removing odors from a cutting board is usually simple with baking soda, vinegar, lemon and salt. Wood needs gentle care and should never be soaked. Plastic can be washed in warm, soapy water.
Washing boards soon after use, keeping strong foods on a separate board and drying fully all help prevent smells. With these habits, your board can stay fresh for everyday cooking.

Mary is a home cooking enthusiast and kitchen gear reviewer with a passion for practical cookware and food preparation tools. She enjoys testing cutting boards, knives, kitchen gadgets, and other cooking essentials to help home chefs make smarter buying decisions. Through KitchenCutting.com, Mary shares honest product reviews, buying guides, and helpful kitchen tips to make cooking easier, safer, and more enjoyable.